Configuring databases
Antigen Plus supports both cloud databases managed my Antigen Plus, and local databases managed by your local database administrator. You may use any combination of cloud and local databases, up to the limit of your software license.
By default, Antigen Plus connects to the cloud database named default. Users may switch databases by choosing the Select database… command from the File menu, or by choosing a customized shortcut when they launch Antigen Plus.
Remember that the first user to connect to a given database will become the Antigen Plus administrator for that database. You may want to ensure that the laboratory manager is the first to connect to a new database.
Cloud databases
Cloud databases are managed by Antigen Plus and stored in the Microsoft Azure US East datacenter. These databases are managed by Microsoft to ensure high availability.
Each registered copy of Antigen Plus starts with a cloud database named default that can immediately be used for evaluation and testing. To request additional databases, contact customerservice@antigenplus.com and let us know what you would like the new database to be named. We will let you know when the new database is ready.
Local databases
Creating a local database requires:
- Creating an empty database in SQL Server
- Editing the file
connections.configto specify the connection string to that database
Creating a local database
You may create a local database on any server running SQL Server 2008 or later. The server instance can be shared with other databases, or dedicated to Antigen Plus, at your preference. Remember that you are responsible for backups of local databases.
The database can be created empty. All users of the database should have db_owner access to the database. We recommend creating an Active Directory group for users of Antigen Plus, and then granting that group db_owner access to the database.
Antigen Plus will install the database schema when the first user connects to the database. Since this takes several minutes and this user will become the Antigen Plus administrator for that database, you should arrange for the laboratory manager to be the first user to connect to a new database.
Editing connections.config
Local databases are configured by editing the file connections.config in the
Antigen Plus installation folder, which is normally
C:\Program Files (x86)\Antigen Plus 8.5. This file is in XML format. The
default contents of this file are:
<?xml version="1.0" encoding="utf-8"?>
<connectionStrings>
  <clear />
  <!--
  <add name="Validation" connectionString="Data Source=OurSQLServer;Initial Catalog=AntigenPlusValidation;Integrated Security=True;Connect Timeout=30" providerName="System.Data.SqlClient" />
  <add name="Production" connectionString="Data Source=OurSQLServer;Initial Catalog=AntigenPlusProduction;Integrated Security=True;Connect Timeout=30" providerName="System.Data.SqlClient" />
  -->
</connectionStrings>
The symbols <!-- and --> are XML comment delimiters which prevent the sample
<add commands from being executed. When you edit the file to include your own
databases, your <add commands must be outside of these delimiters.
Note that there are three different names used in each connection string, and each has a distinct purpose:
- name
-
The connection name that identifies the connection string to Antigen Plus. This is the name you should use in your Antigen Plus shortcut.
- Data Source
-
The hostname of the SQL Server.
- Initial Catalog
-
The name of the database on the SQL Server.
The sample connection strings that we provide are configured to use Active
Directory for user authentication (Integrated Security=True), which is what we
recommend.
You can find additional details about connection strings in Microsoft’s documentation for SQLConnection.ConnectionString.
Creating a database shortcut
By default, Antigen Plus connects to a cloud database named default. If you want users to connect directly to a different Antigen Plus database, then you should create a custom application shortcut that specifies the name of the connection string and whether the database is local or in the cloud.
To create a custom application shortcut:
-
Locate the application
AntigenPlus8.exein the installation directory, which is normallyC:\Program Files (x86)\Antigen Plus 8.5. -
Right-click on the application and choose Copy.
-
Right-click on the Desktop and choose Paste shortcut.
-
Right-click on the shortcut and choose Properties.
-
Move the text cursor to the end of the
Targettext field and append the text:/local connectionname
or
/cloud connectionname
where connectionname is the name you provided in your
connections.configfile (for a local database) or requested from Antigen Plus (for a cloud database). If the connection name contains a space, enclose the name in double-quotes. Make sure you leave a space between the double-quote at the end of the existing Target text and/localor/cloud. When you are done it should look like: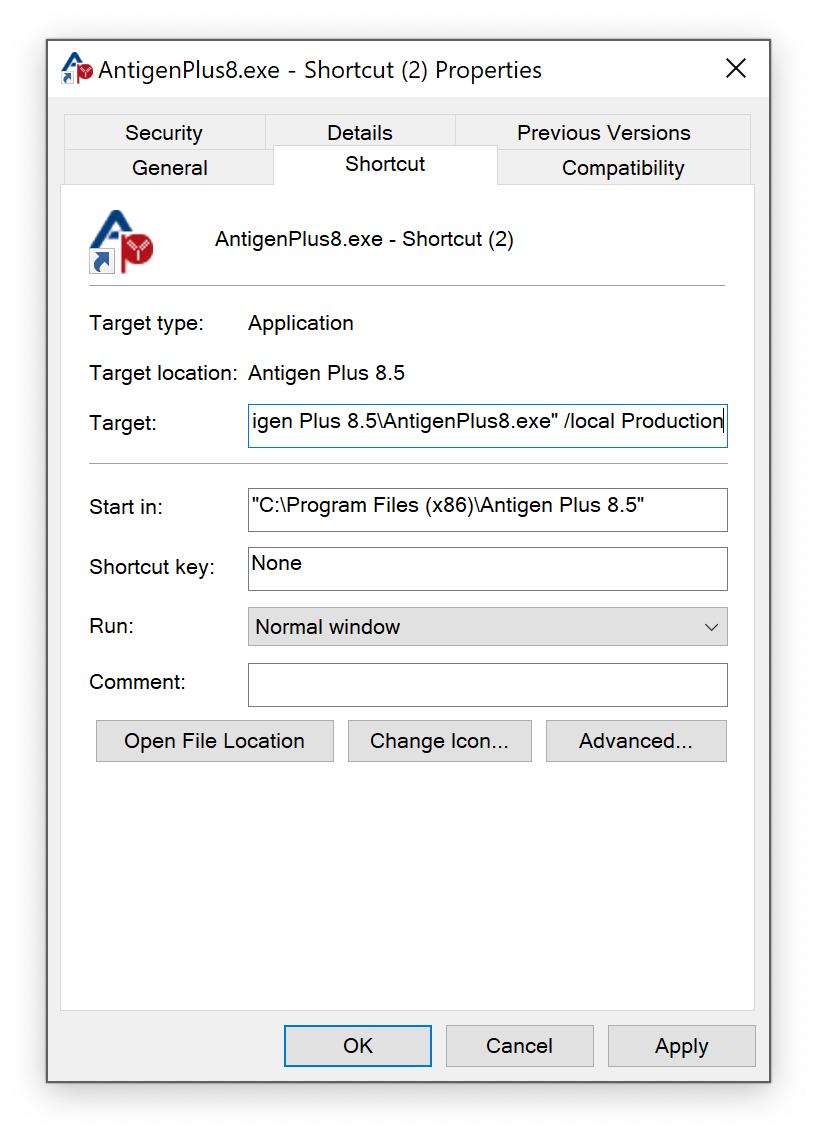
-
Click OK to save your changes.
-
Rename the shortcut as desired.
-
Copy the shortcut to a location where it can be accessed by all Antigen Plus users.