Operation
Downloading Lots from the Internet
When you press Download Lots from Internet from the Lot menu, you will see the following screen:
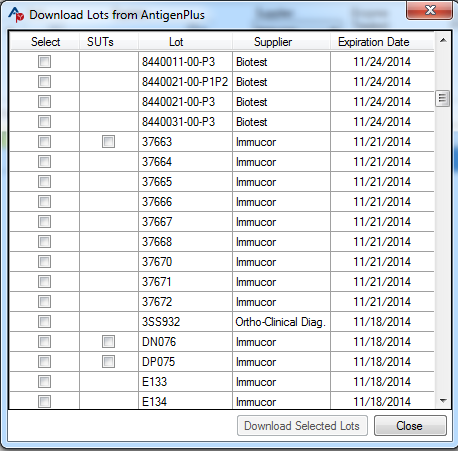
Available panels are listed in descending order of Expiration Date. They may also be sorted in ascending order or by Supplier or Lot Number by clicking on the column title. You may select as many as you wish, the number selected is displayed at the bottom of the screen as each panel is added to your database when you click Download Selected Lot(s).
Downloading Lots with Supplemental Typings
Immucor provides supplemental unconfirmed typings with some of their panels. You may download some or all of these by selecting the SUT box next to the lot number when you are downloading. You will be given a choice of which typings you wish to see on your downloaded cells in a dialog box. Your choices will remain and may be changed or not the next time you download.
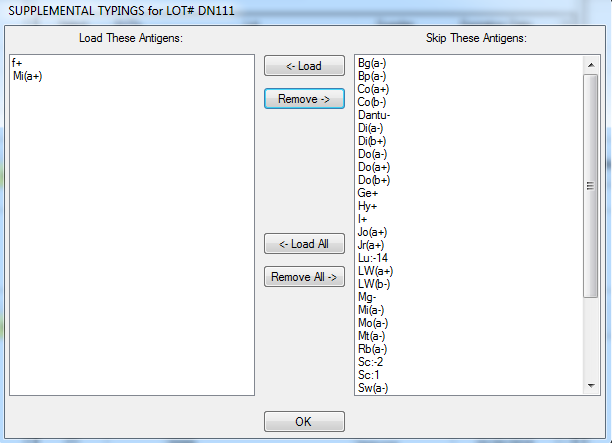
While the main panel data are verified electronically and do not require physical validation (with the current exception of Medion), the supplemental typings should be checked by donor to ensure that they have all been captured. Manual entry of any missing ones can be done by pulling up the donor on the Add/Edit screen.
Download Prompt Option
If you have selected Prompt when downloading duplicate cells in the System Options menu, you will be notified whenever donors on the downloading panel exist in your database. You can ignore the notification, mark the duplicate cells as out of stock, or delete them. If you attempt to delete a cell that has been stored as part of a saved panel, you will be advised to mark it out of stock instead.
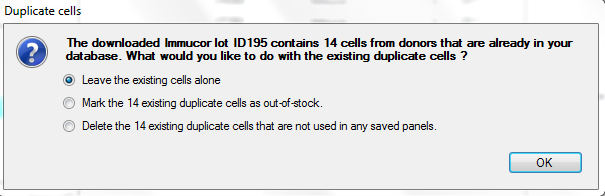
Please note: If you are importing two identical panels (e.g. Quotient panels that are the same except that one is enzyme treated), both panels will be marked out-of-stock if you have this feature turned on and chose the out-of-stock option.
Searching and Selecting Cells
Search Pattern
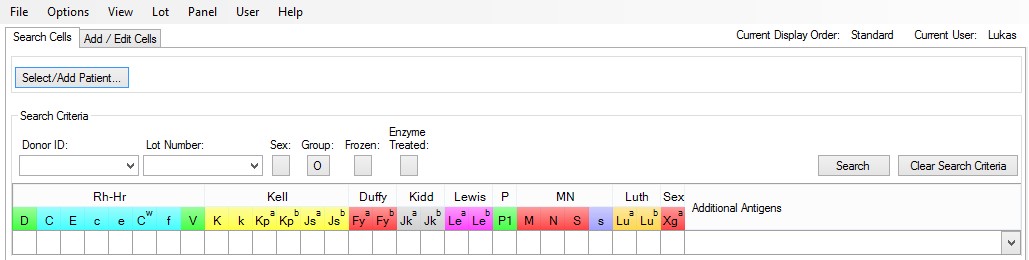
When the program starts, the Search screen will automatically be displayed. A search pattern box allows you to enter a search pattern of the 28 principal antigens and/or any additional antigens, search the inventory for matches, and mark cells or lots for inclusion in a Selected Cells Panel or a Results Worksheet. (Some red cell suppliers include additional antigens on their array and some leave off principal antigens; those arrays are displayed that way in Antigen Plus if that supplier is chosen. See Antigen Order for Selected Cells on page 25.)
As you search your database, you will notice color-coding that will highlight the search boxes change as you select and de-select cells. For an explanation of the color-coding function, see page 36.
If search automatically when search criteria change is selected in the Search tab in the System Options menu, the search panel will immediately display how many cells are found in your database that are matches for your current search pattern. If this option is not selected, you must enter your search criteria and click Search to display the matching cells from your database. In either case, the number of matches that your current search has found will display at the bottom of the screen. The number of cells currently selected will also display at the bottom of the screen and will update each time you select or deselect a cell.
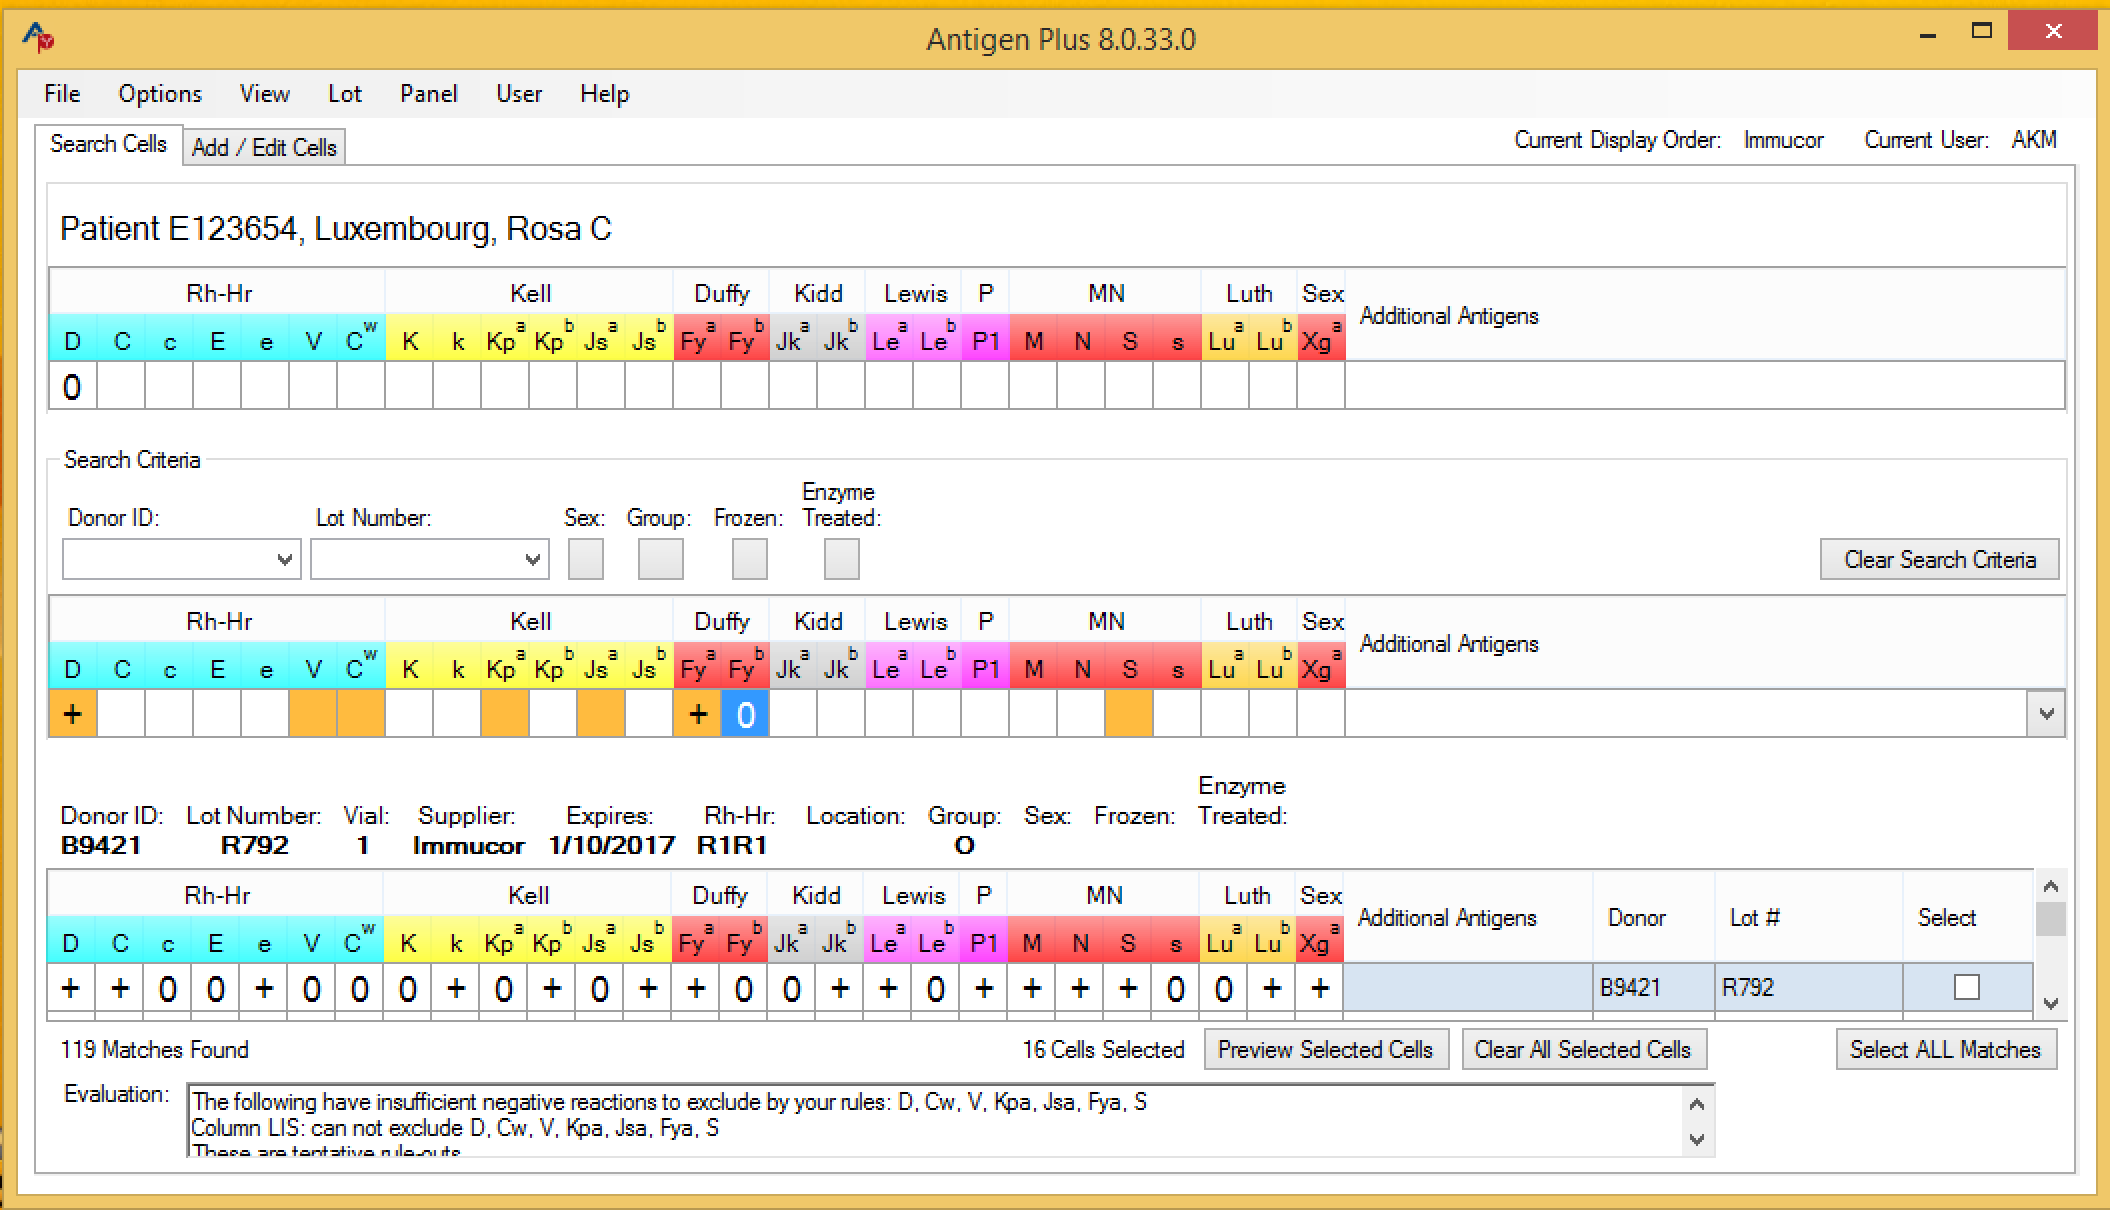
To enter a search pattern, click the desired antigen buttons in the search pattern box. You may set the buttons to 0, +, or blank. A 0 or + setting means that a matching cell must have a 0 or + in the same place (s or w designations will be read as + during a search). A blank setting means “don’t care”, and during a search those antigens will be ignored.
You may also search by the following criteria: Donor ID,** Lot Number , Sex , Group , Frozen cells, and Enzyme Treated** cells. Please note that if you are currently searching by a particular lot, your searches will only include cells from that lot until you have cleared that lot from your search criteria.
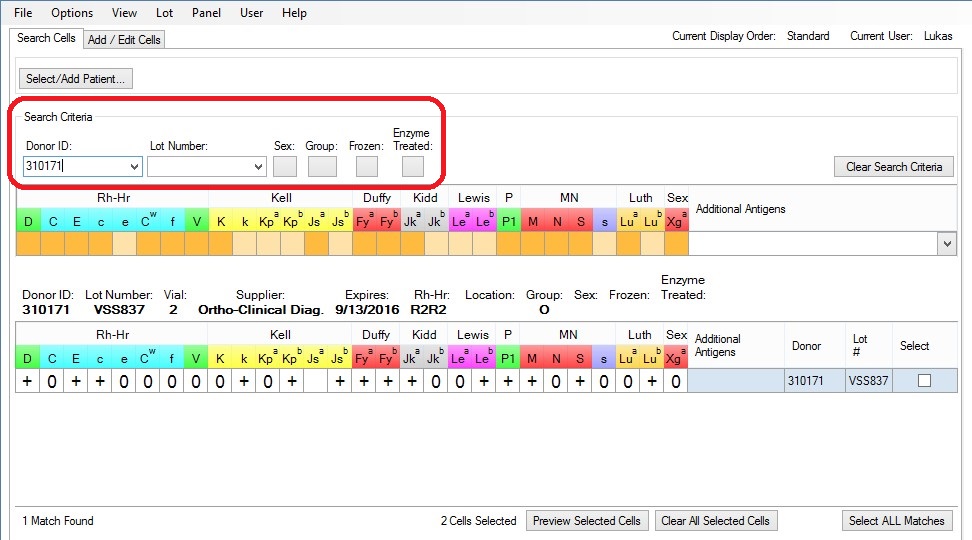
When you search, the inventory will be searched starting with the newest cells first, that is, in reverse expiration date order. All frozen cells have no expiration date and will be gathered at the end of the search order unless you have specified a preferred supplier in System Options in which case all cells from that supplier will be found first in reverse expiration order and be followed by all other suppliers in reverse expiration order. Clicking on a cell in your search results will highlight it in light blue and information about that cell will display above your search results. Please note that Out-of-Stock cells will not be displayed in your search if Exclude from Searches is selected in System Options.
To clear your current search criteria and start a new search, select Clear Search Criteria.
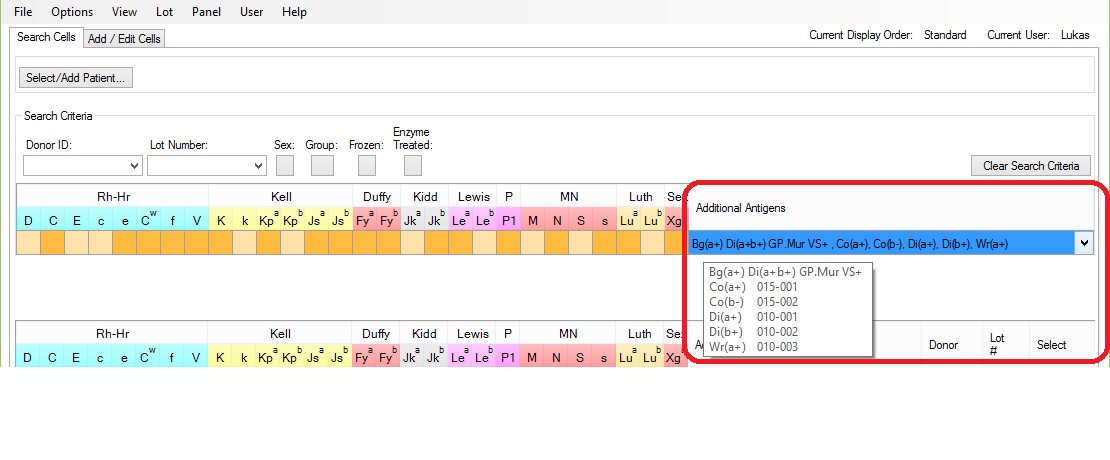
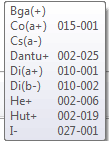
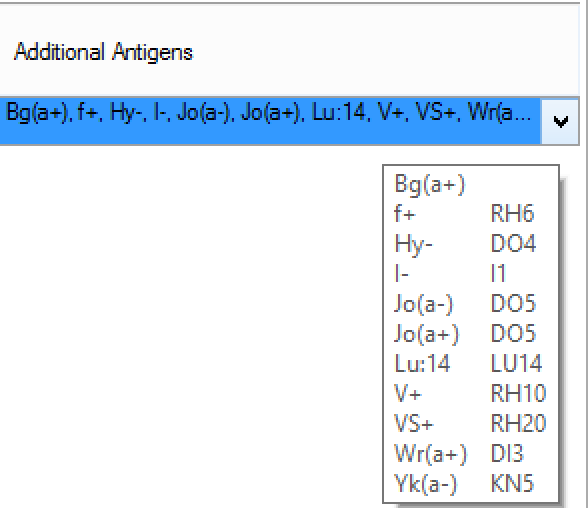
To add additional antigens to the search pattern, check those desired in the Additional Antigens box by selecting the arrow on the right of the box to drop down a list of all the additional antigens in your database. You may select as many additional antigens as you like, but only the first 8 to 10 (depending upon their length) will display on the screen and an ellipsis will indicate that more are selected. If you mouse over any of the selected antigens or the ellipsis, a box containing all of your selected antigens and their associated ISBT designations will appear.
A table of ISBT designations used in Antigen Plus can be found in the Appendix. To remove Additional Antigens from the search display box, uncheck the item(s) in the Additional Antigens drop down list.
Selecting and Deselecting
To select a cell, check the Select box to the right of each cell. To select all cells in your current search, click Select ALL Matches. Cells that are selected with a check mark are automatically included on Selected Cell and Results Worksheet panels, which can be called up by choosing the appropriate option in the Panel menu or by selecting View Selected Cells or Open Worksheet at the bottom of your search screen. When duplicate cells are selected, they will be highlighted in yellow so that they may be easily de-selected.
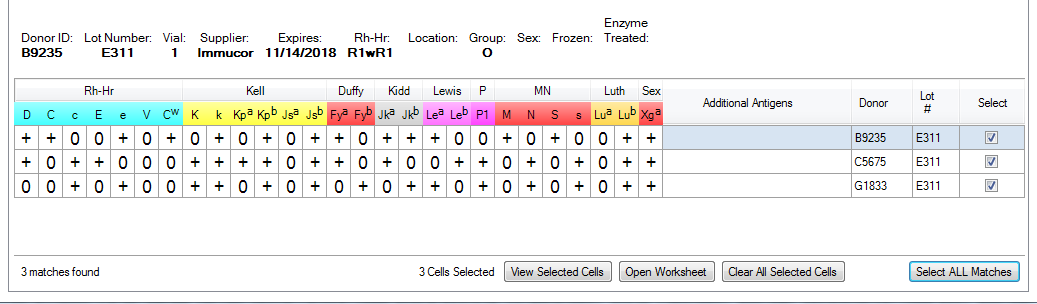
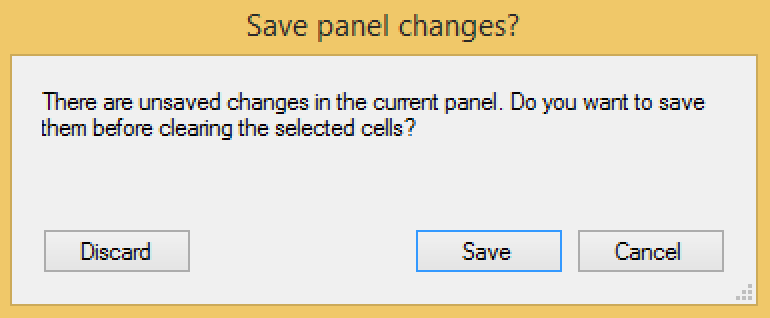
Your currently selected cells will remain selected until you uncheck the Select box next to each cell or until you click Clear All Selected Cells. If you choose to clear all selected cells and you have not saved your current work, a warning box will appear asking if you would like to either Save or Discard your current selected cells panel.
Selecting Expired Cells
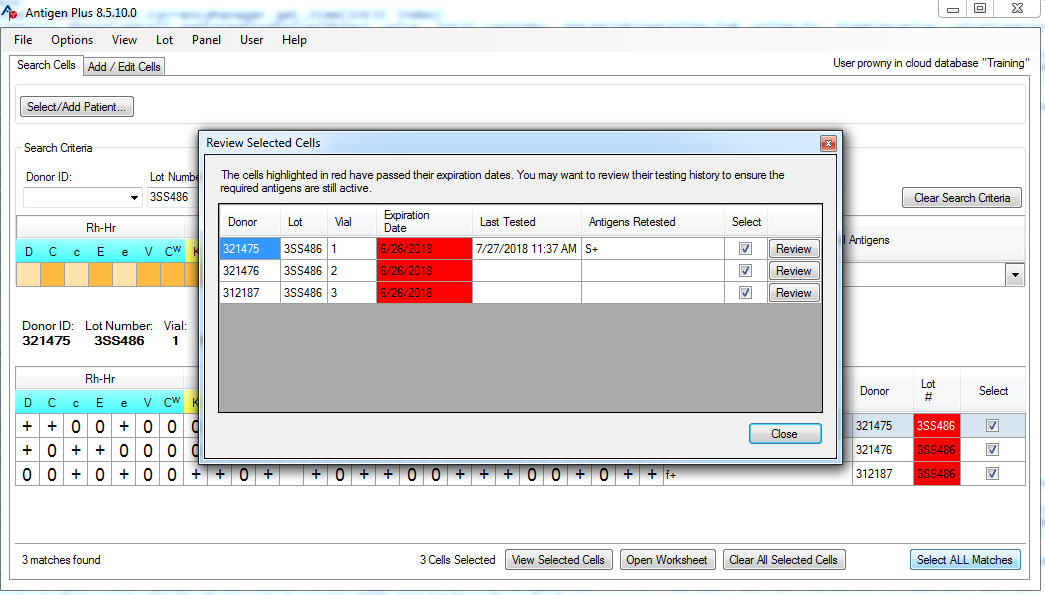
Whenever you select a cell (or cells) with an expiration date that has passed, a dialog box will appear allowing you to select that cell (or cells) to enter the results of testing to ensure that cell is still reactive for the specific antigens in question. You may enter the result for any or all of the positive antigens on that cell and those results will be maintained with the date of the test and the name of the tester. You may opt out of this process by selecting Close and the cell will still be selected.
Antigen Order for Selected Cells
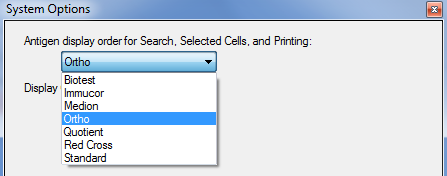
The antigen buttons are displayed in a standard default order of blood groups: Rh-Hr, Kell, Duffy, Kidd, Lewis, P, MN, Lutheran, and Sex-Linked. Some suppliers’ data sheets list them in a different order, so in order to simplify searching, selecting, and entering data there are 9 display options selectable with the 9 option buttons in the System Options menu. These choices stay with any donor displayed in the Search mode (if more than one supplier is represented, the Additional Antigens box will accommodate any typings missing from an array; e.g. if you are using the Immucor order that omits the “f” typing and select an additional cell that has this typing, the “f-“ or “f+” will appear in the Additional Antigens box (exclusion rules will consider the 28 common typings regardless of where they appear on the screen).
Please note: If the manufacturer does not provide the “f” typing, Antigen Plus will make no assumptions and will not rule it out. For more information, see page 50.
Available Arrays
Option 1: BioTest

Option 2: Immucor

Option 3: Medion/Grifols

Option 4: Ortho

Option 5: Quotient

Option 6: Red Cross Preferred

Option 7: Standard (Johns Hopkins) Option

Option 8: Bio-Rad

Option 9: Grifols

Selected Cells Panels
Your panel of currently selected cells can be called up and reviewed by either clicking Preview Selected Cells at the bottom of the Search screen, or by going to the Panel menu and choosing Selected Cells Worksheet. Either option will cause your Selected Panel will appear in a separate window.
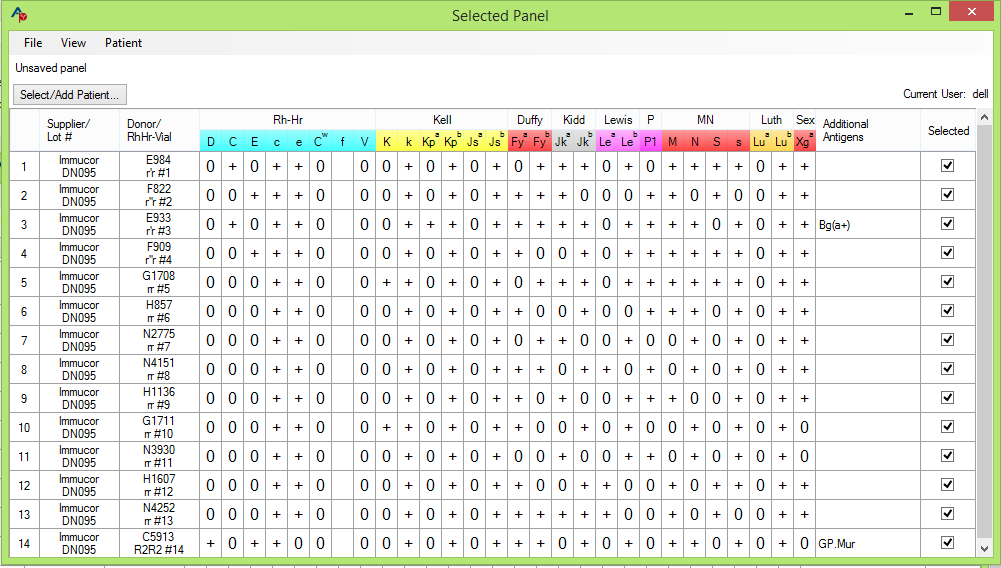
On the Selected Panel screen, you may review all of your currently selected cells and deselect any cell by unchecking the Selected box to the right of each cell.
You may also assign the Selected Panel to a particular patient by choosing Select/Add Patient. For more about entering patients and patient information, see page 30.
Your currently selected cells may also be called up in a Results Worksheetby by either clicking Open Worksheet at the bottom of the Search screen, or going to the Panel menu and choosing Results Worksheet. In the Results Worksheet, you may enter and evaluate your test results. For more information about entering and evaluating test results, see page 33.
On any Selected Cells panel or Results Worksheet, the cells will be sorted according to your preferences in System Options.
Saving and Loading Panels
To save a panel, go to the File menu on a Selected Cells panel or Results Worksheet and choose Save Panel. When saving a panel, you must set a panel number. You may then add a Patient, add Conclusion Antibodies and Conclusion Notes, and add a Full Panel Description. In the panel description, you may enter as much text as you like and it will be saved along with the panel. Please note: you may save a Selected Cells panel or a Results Worksheet without a patient as long as no results are entered. Once results are entered on a Results Worksheet, you must add a patient in order to save the work-up.
Printing Panels
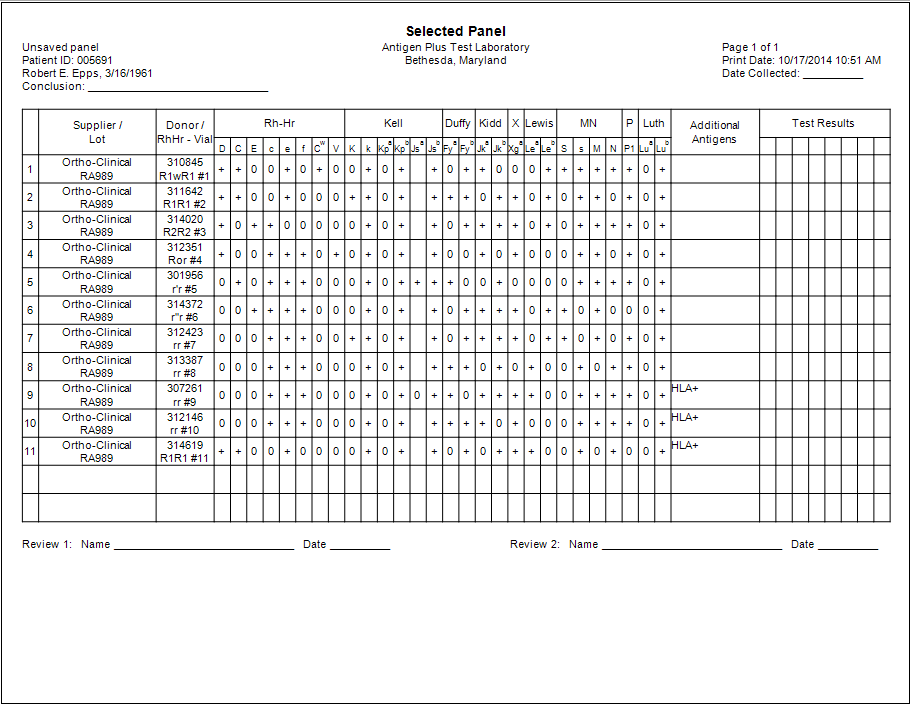
The Selected Panel Worksheet may be printed at any time by selecting File/ Print at the top left of the screen. If there are more additional antigens than can print on one line, more lines will be inserted underneath the cell until all additional antigens are printed. The worksheet will display the date and time it was printed. If a patient has been selected with the Selected Panel, the patient information will display on the print-out. The Selected Panel Worksheet prints out with eight blank columns on the right for manually entering test results and additional blank rows beneath the last selected cell to the end of the page.
Print Blank Antigram:
Prints a completely blank panel, just like above but with the supplier, donor, and antigen columns left unpopulated. It will have blank spaces at the top for writing patient name, patient ID, conclusion, technologist, date collected, and date tested.
Patient Information
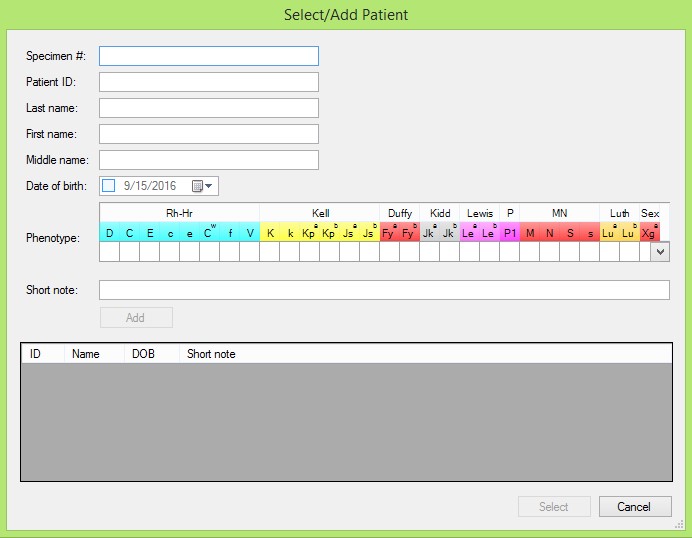
Information about patients that will display on the Search screen and remain with saved work-ups is entered on the Search screen by selecting Select/Add Patient. On the Search screen, click on the Select/Add Patient button and search for a patient to modify, or fill in a new ID, name, and optional date of birth and short note and press Add.
You must enter an ID for the patient that will uniquely identify that patient. The nomenclature or protocol is up to you. When a patient is selected, their ID and their first and last names will appear at the top of the Search screen as well as the Selected Cells panel and the Results Worksheet. Saving any work-up with a particular patient selected will attach that patient to the printed worksheet as well as the saved lot table.
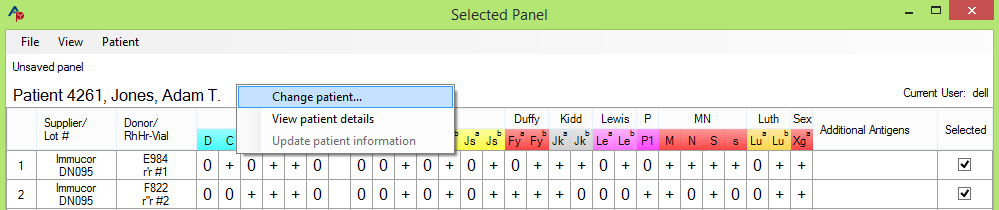
When a Patient is selected and displayed at the top of the screen, you may right-click on the patient to either Change Patient , View Patient Details , or Update Patient Information. Change Patient will take you to the Select/Add Patient screen and allow you to switch to a different patient. View Patient Details will bring you to their patient details screen where you can edit that patient’s information and view the editing history for that patient.
You may also call up a list of your patients by selecting Patients from the View menu. Double-clicking on a patient or highlighting a patient and clicking Details will call up the Patient Details screen for that patient where their information may be added or edited. Only administrators may edit patient details.
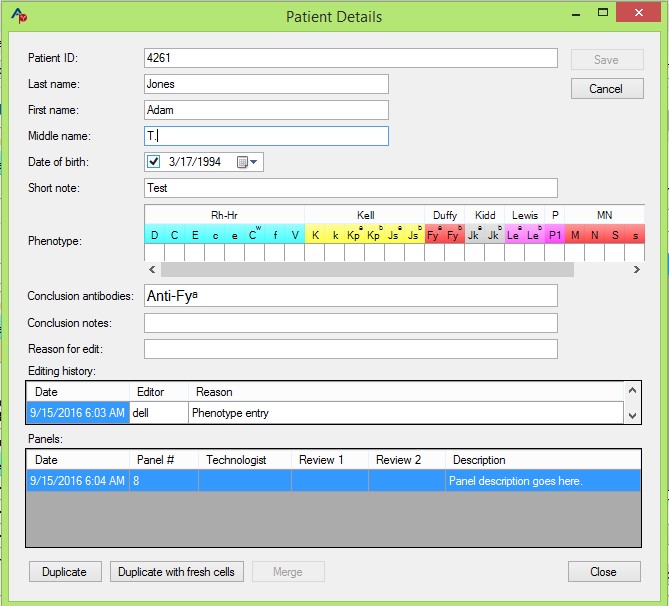
The following information may be stored with each patient:
- ID (required)
- Last name (required)
- First name (required)
- Middle Name
- Date of Birth
- Short Note
- Phenotype: A patient’s phenotype will populate the Auto Control row at the bottom of the selected cells in the Results Worksheet whenever a patient is assigned to the worksheet.
- Conclusion Antibodies and Conclusion Notes : See page 38.
- Specimen Number : When adding a new patient, there is a space to add the specimen number that will be associated with that patient’s current workup. The specimen number will saved with the panel rather than with the patient. For more on specimen numbers, see page 33.
Each time you edit a patient’s information in their Patient Details screen, you must enter a reason for the edits. All previous edits to that patient will be displayed on the Patient Details screen under Editing History. Each saved panel that the patient is attached to will also display under Editing History. You may double click on a saved panel to load it, or you may select a saved panel and choose to Duplicate or Duplicate with Fresh Cells.
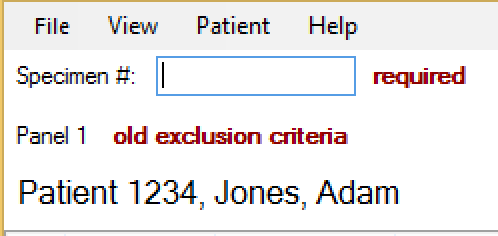
Update Patient Information: If you load a saved panel with a patient whose information has been changed, it will be marked Obsolete. Selecting Update Patient Information from the Patients menu will bring the patient information current so that it is reflected on the worksheet. Any user may use the update patient information option.
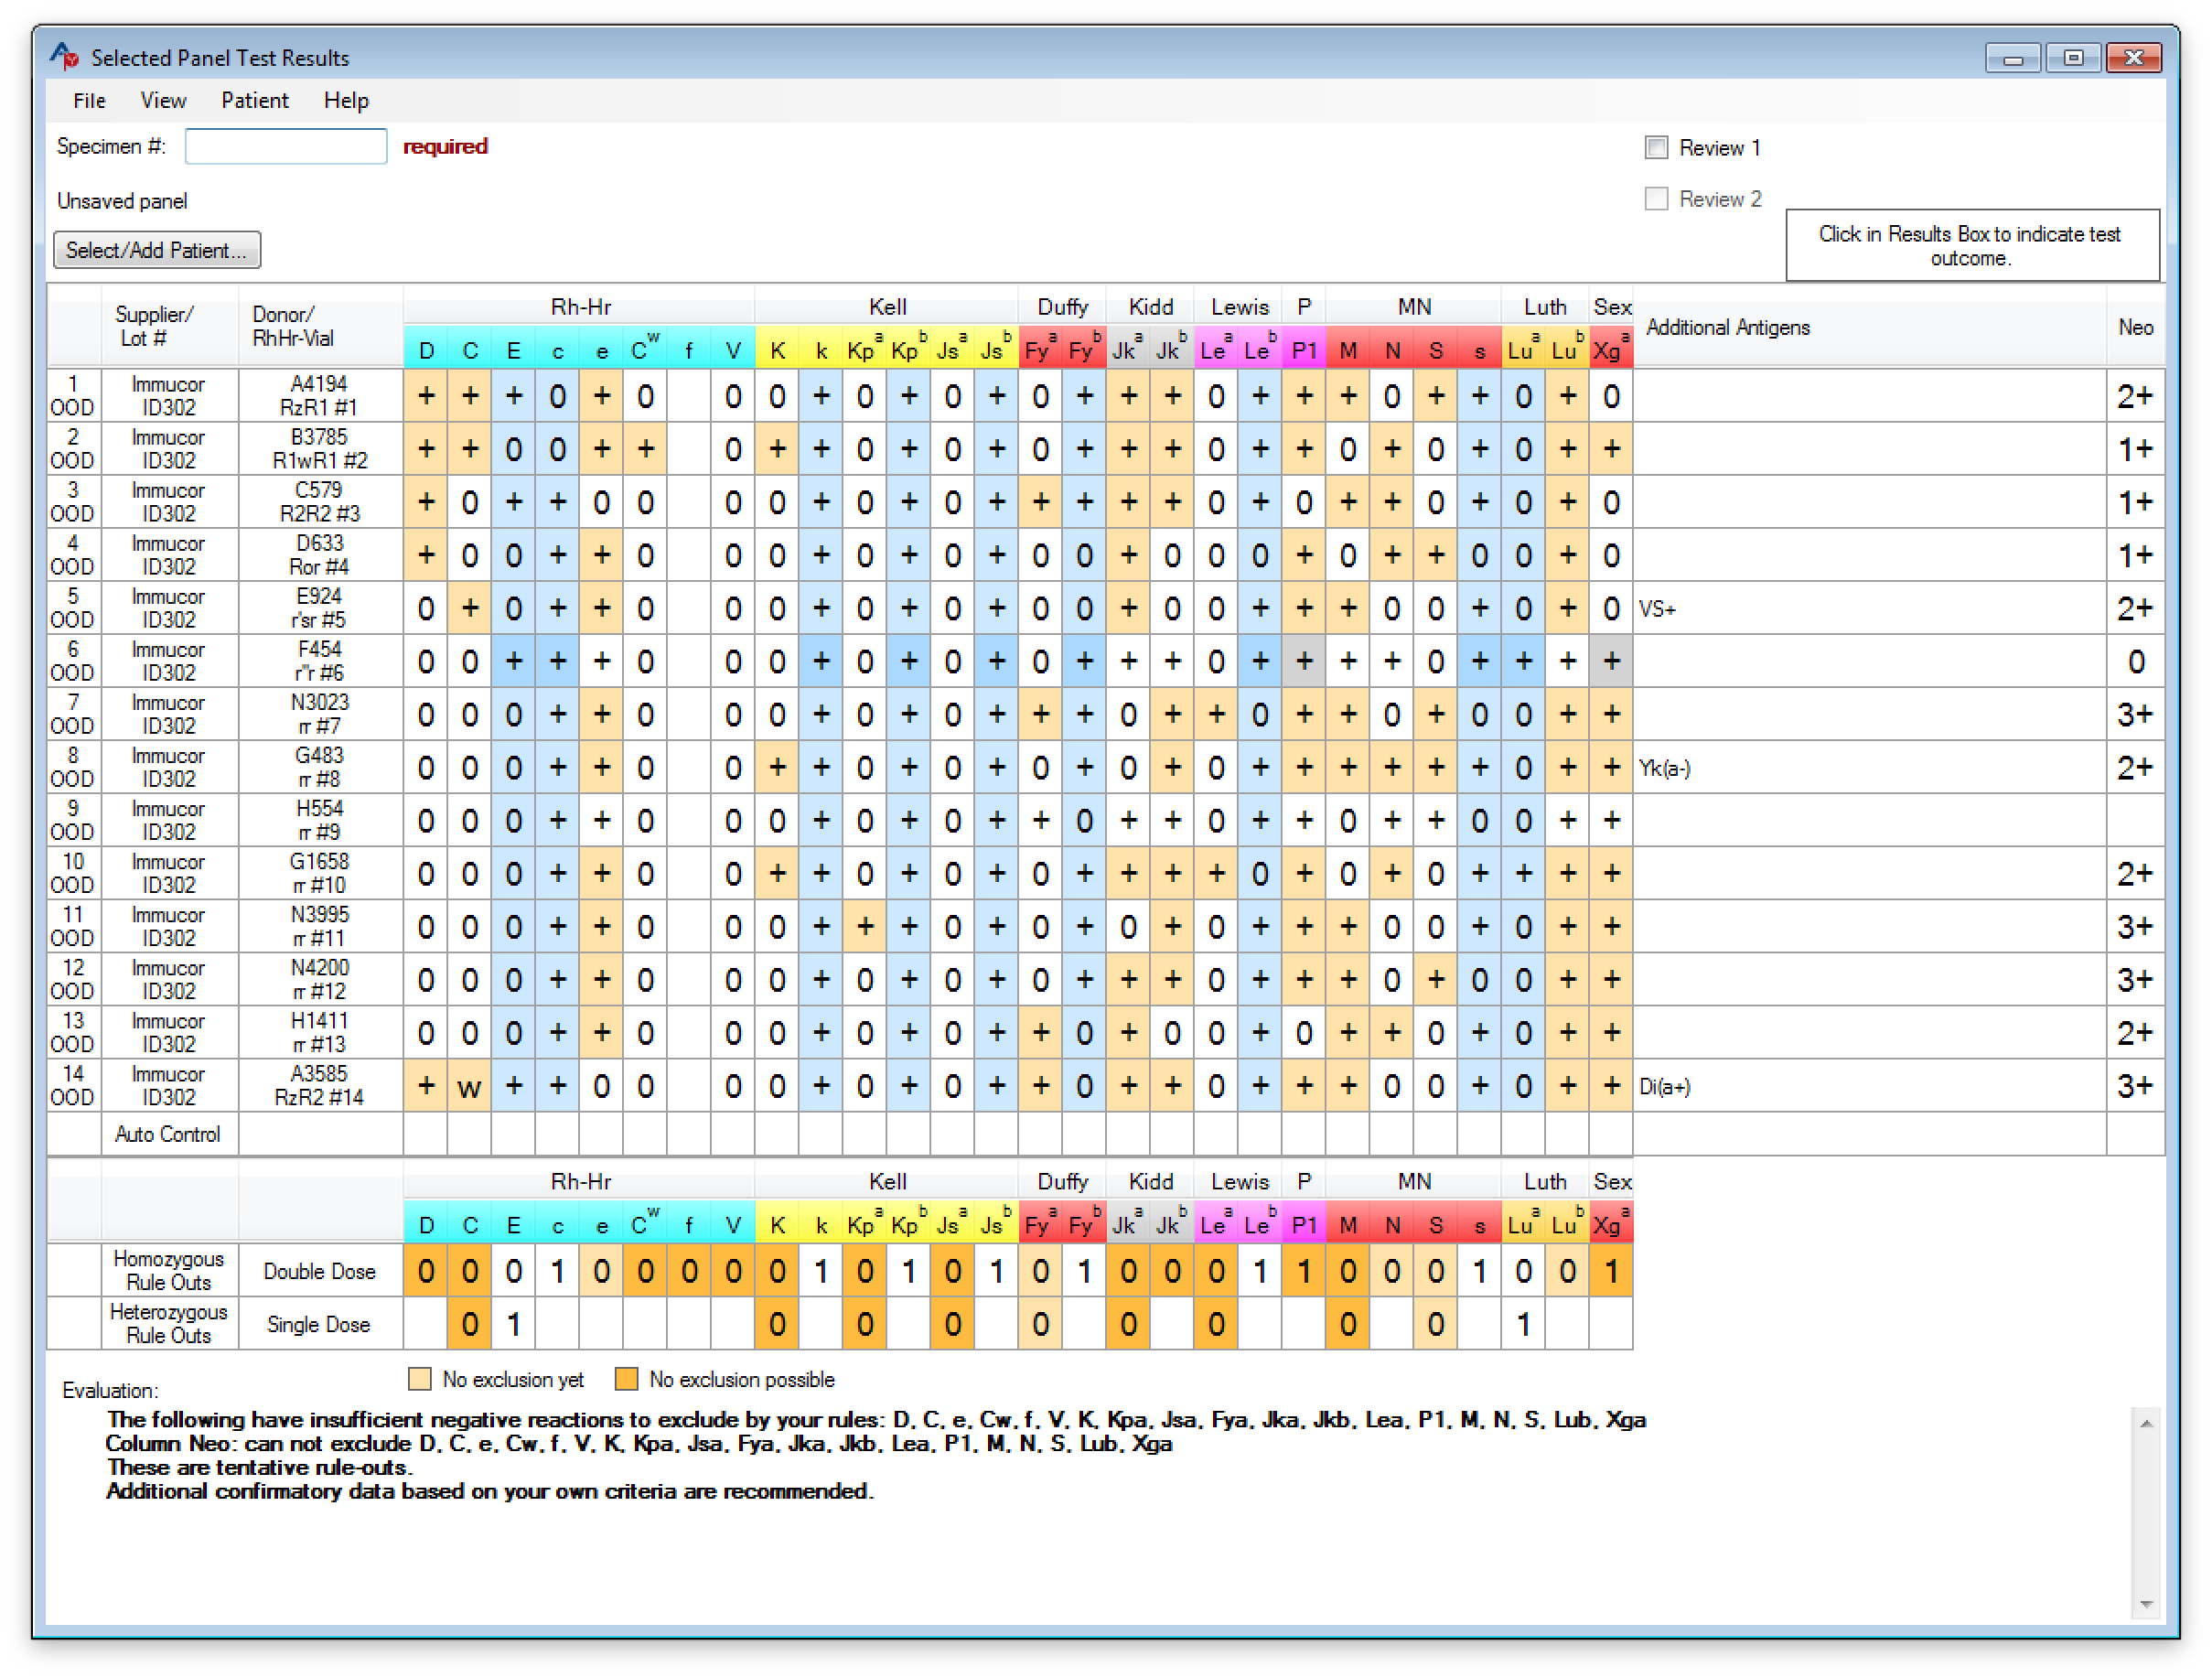
Entering and Evaluating Test Results
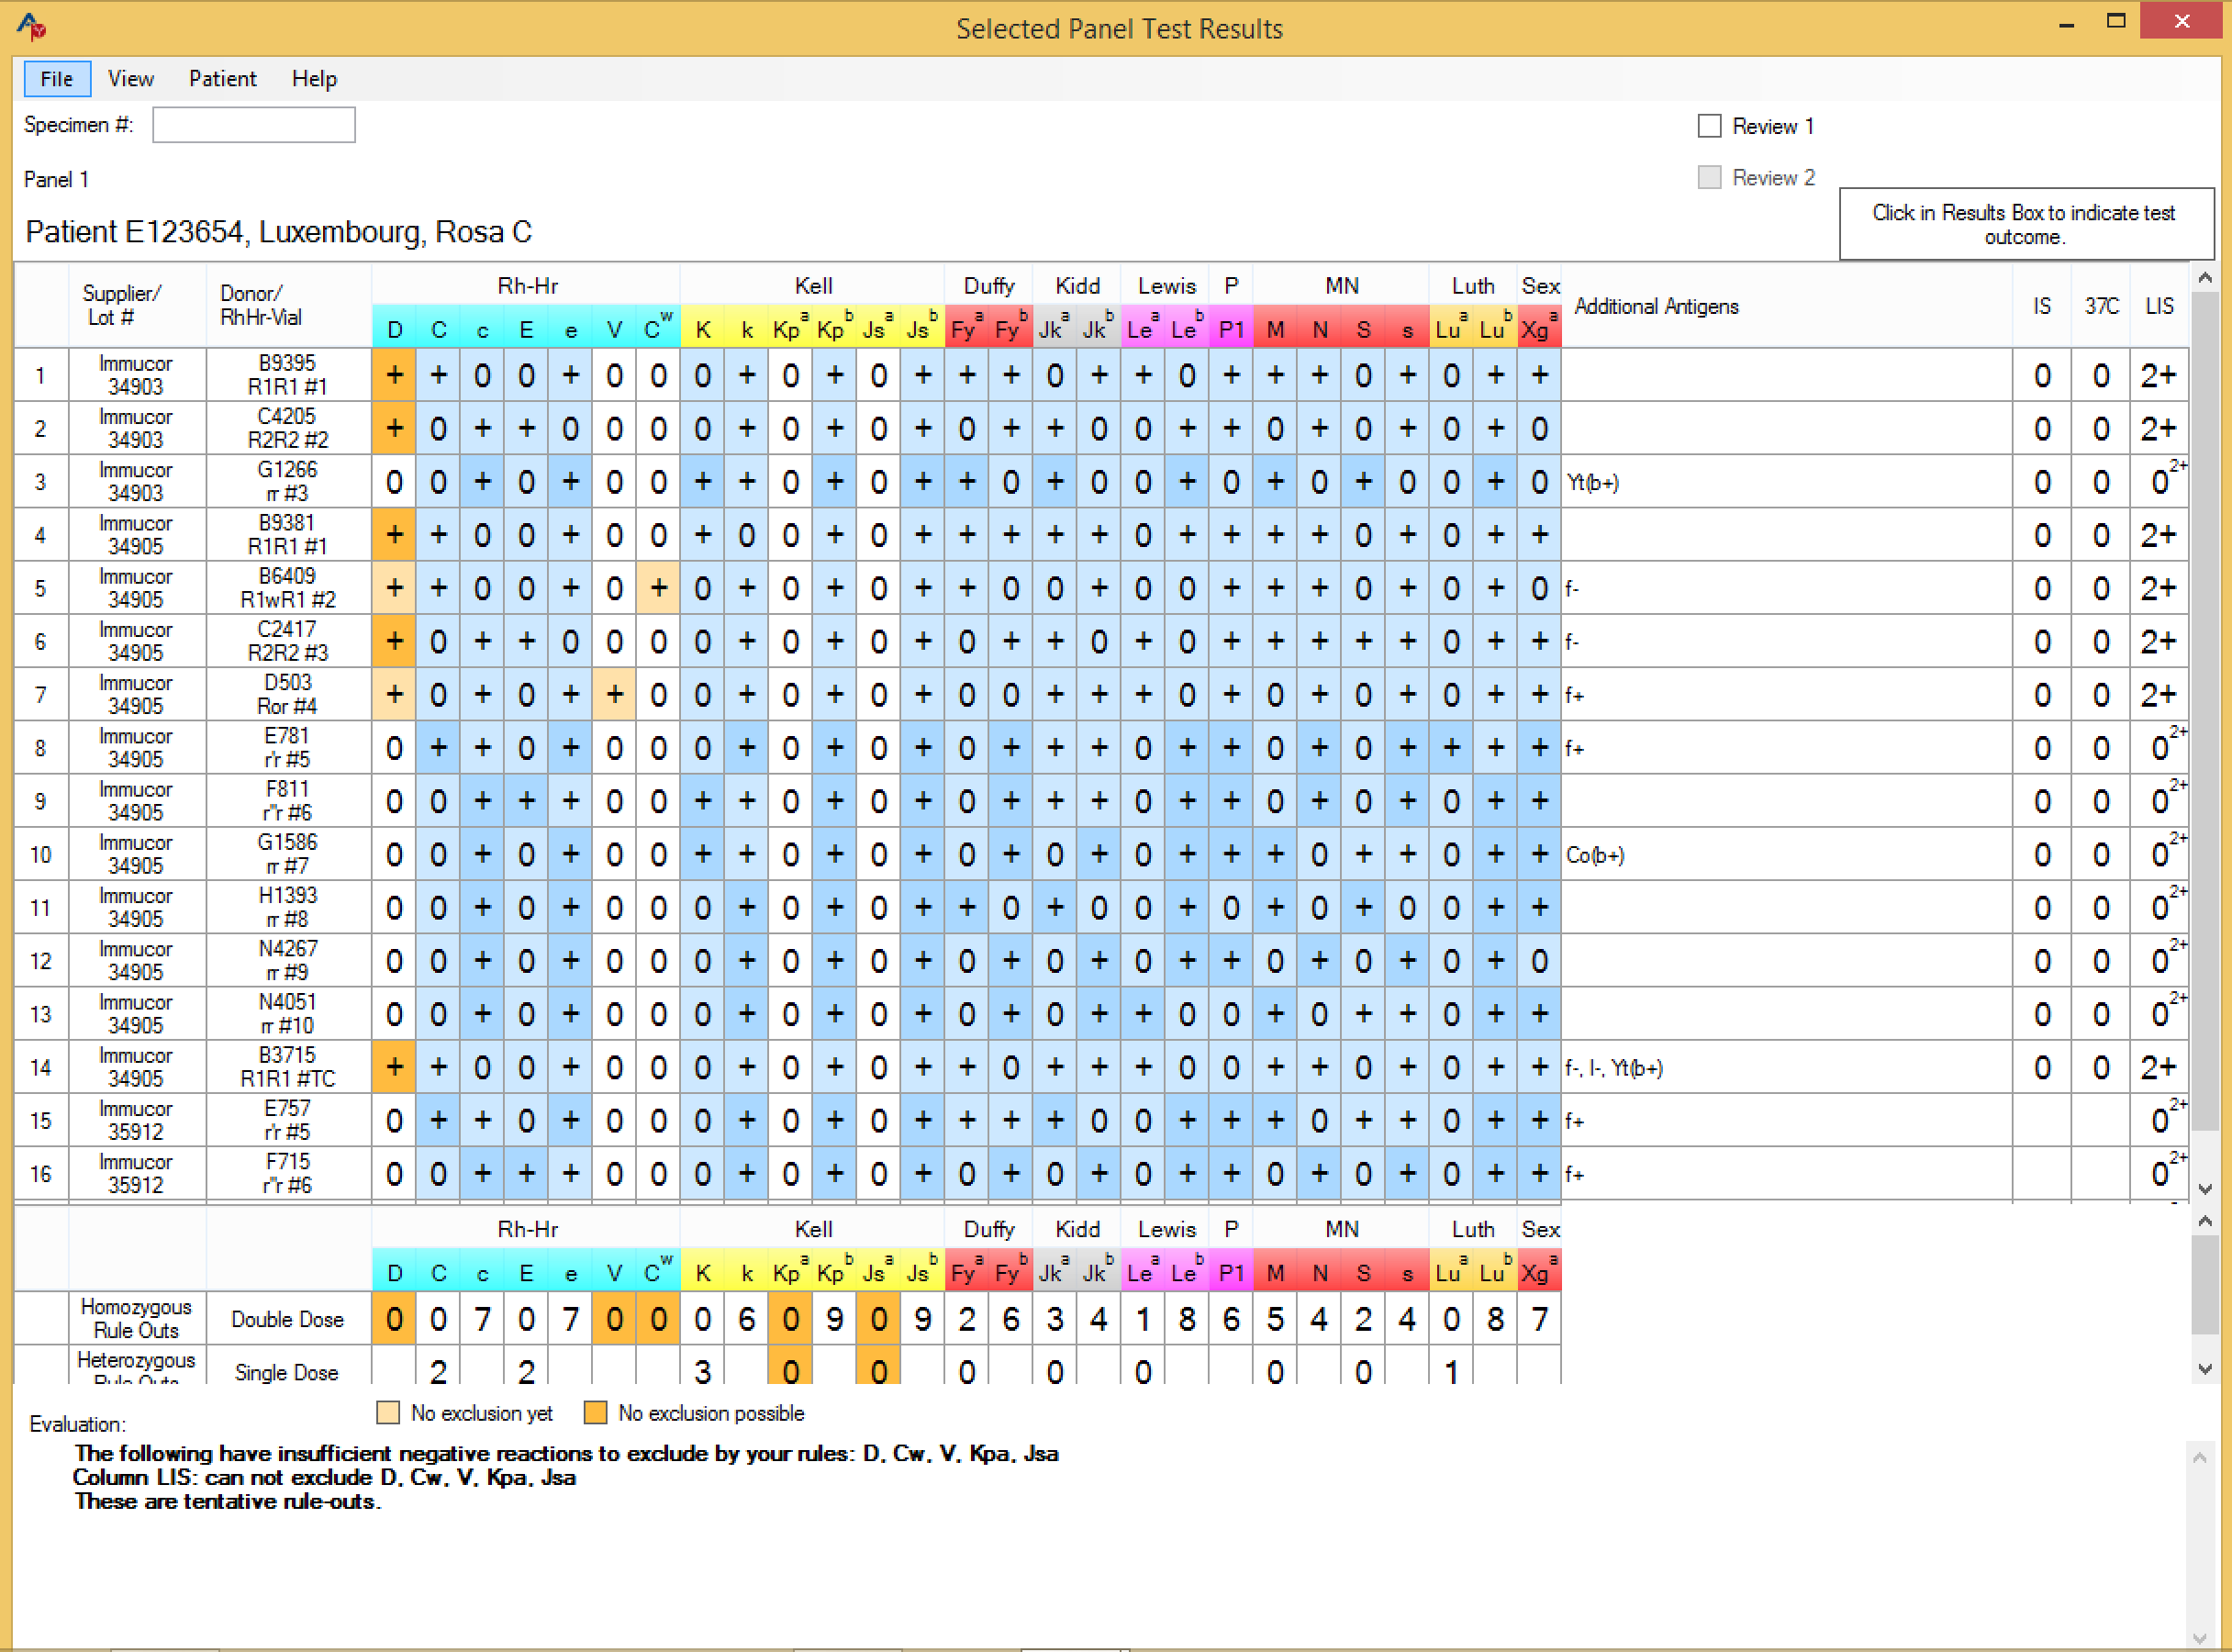
Test results may be entered and evaluated using the Results Worksheet. The Results Worksheet may be called up from the Search Screen or Panel menu whenever selected cells are present. Any antigens that cannot be excluded by the current selection are highlighted in the Count rows at the bottom of the screen. Results can be recorded as they are read by clicking in the box in the appropriate test column that is in the same row as the tested cell. The test column box will be highlighted and a drop down box will appear with a choice of results that may be entered by clicking on the desired number. The default choice is 0 through +4 (Agglutination Grading). Result choices may be seen and entered in the Marsh 0 to 12 scale by choosing that option in the System Options menu. If you are entering results in a column that requires a check cell entry, the check cell box will appear each time you enter a negative result. You must confirm that negative result by entering a positive result in the check cell box. Once a choice is entered the cursor will move down to the next tested cell and you may repeat the procedure. To remove a result from a box, click once on the box, then click on the blank space above the zero in the choices box. To assist in navigation, the row upon which the cursor is resting is highlighted.
Specimen Number
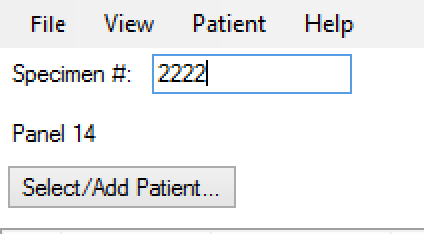
If Require Specimen Number is selected by an administrator in System Options, you must enter it wherever it appears. If Require Specimen Number is not selected, the choice to enter a specimen number on your results worksheet is optional. Whether or not the specimen number is required, once a specimen number is entered it must be entered every time the results worksheet is opened.
Note: If you retrieve a workup with a specimen number on it that you no longer have, you can retrieve that specimen number by selecting File - Print Preview on the worksheet.
Count Rows
The number of homozygous and heterozygous rule-outs for each antigen appear in the Count rows below the cell rows and above the Evaluation that specifies which antigens remain to be excluded. Antigens that are never ruled out on a heterozygous cell are automatically set to 0. Antigens that cannot be excluded with the cells currently selected are highlighted in the Count rows. For more on colors and highlighting, see page 36.

If selected in system options, another row counting negative reactions to heterozygous donors may be added to the display.

Result Columns
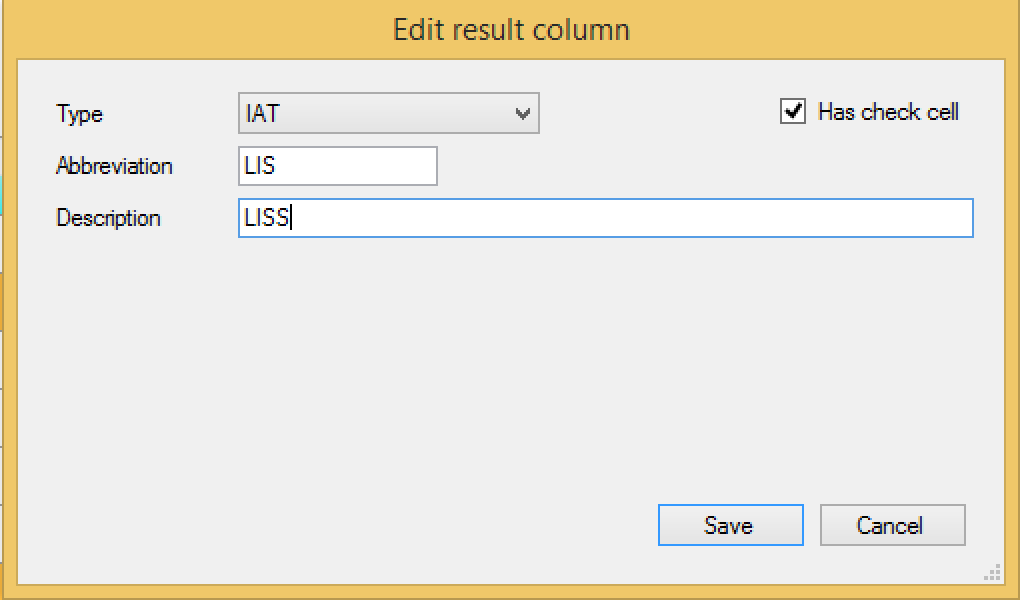
Administrators may select the default column settings by going to the Customize Results Columns screen in the Options menu. However, the current user may edit their current columns directly from the Results Worksheet by right clicking on a column. From here you can select Add Result Column to insert a new column directly to the right of the column that you right-clicked on. You may also select Edit Result Column to directly change the column type, abbreviation, and set a check cell. Here you may enter a column description that will appear in your evaluation text and on printouts. Finally, selecting Delete Result Column will remove that column from your Results Worksheet as long as there are no results entered in the column. These columns will be saved with the worksheet but will not affect the default columns on other worksheets.
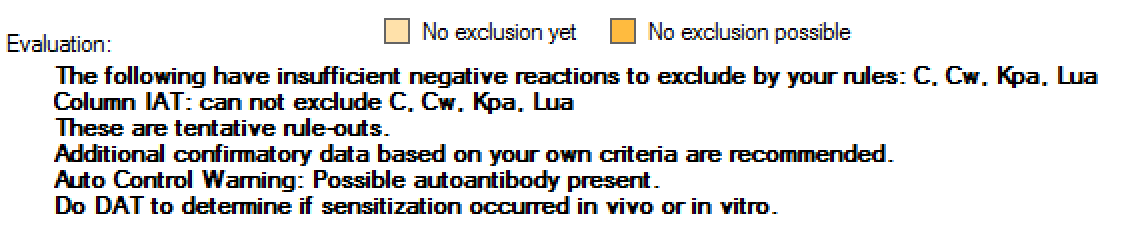
Evaluation Text

The evaluation text at the bottom of the Results Worksheet will keep a running list of which antigens are not yet excluded. This information is also presented with color-coding on the Results Worksheet and the Search screen.
The evaluation text will also display any column descriptions that you have added.
Color Coding
Antigen Plus now features dynamic color shading of cells to help guide the user as they select cells and enter test results. Color shading is changed automatically in both the search screen and the results worksheet as cells are selected and deselected, and as test results are entered.
In the search screen

White: The antigen has already been excluded.
Light Orange: The antigen has not yet been excluded, but could be excluded if the untested selected cells are non-reactive.
Dark Orange: The antigen cannot be excluded by the current panel regardless of test results. This is an indication that additional cells need to be selected. When a cell is selected that could lead to an exclusion of that antigen with test results, the antigen will turn light orange.
In the test cell area of the Results Worksheet
White: Negative for that antigen
Light Blue: The antigen has been excluded by other test cells.
Dark Blue: The antigen has been excluded, in part because it was ruled out by this test cell.
Grey: There is a rule-out for that antigen from the result on that row, but there are not enough rule outs for that antigen elsewhere to warrant an exclusion based on your exclusion criteria.
Light Orange: The antigen has not been excluded, and is one of several possible explanations for the positive reaction with this test cell.
Dark Orange: The antigen has not been excluded, and is a likely explanation for the positive reaction with this test cell because it is the only non-excluded positive antigen among the 28 antigens that are evaluated by Antigen Plus.
Mouse- over explanations
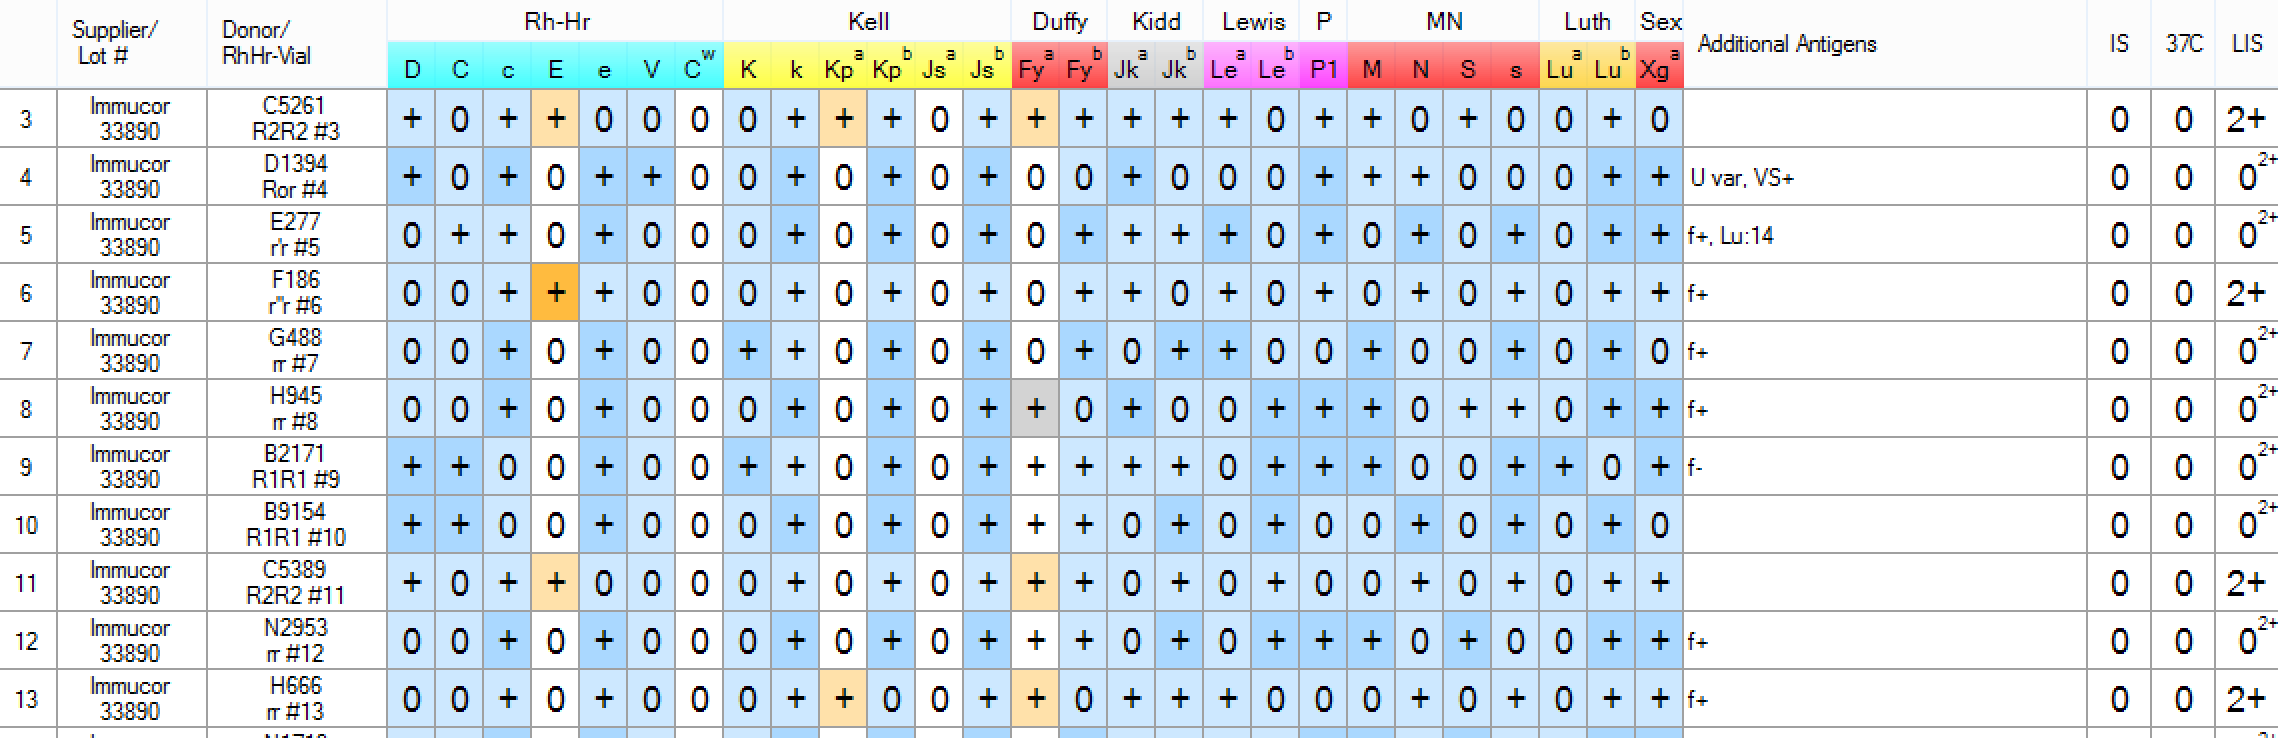
An added feature of Antigen Plus is the ability to see how the exclusion rules are being applied for each rule-out on the screen. Whenever a negative result is entered, you may mouse-over any positive antigen in that cell to see why it was or why it was not ruled out. Any other cell on your worksheet that is involved in a successful rule-out or an unsuccessful rule-out will be highlighted as you mouse-over.
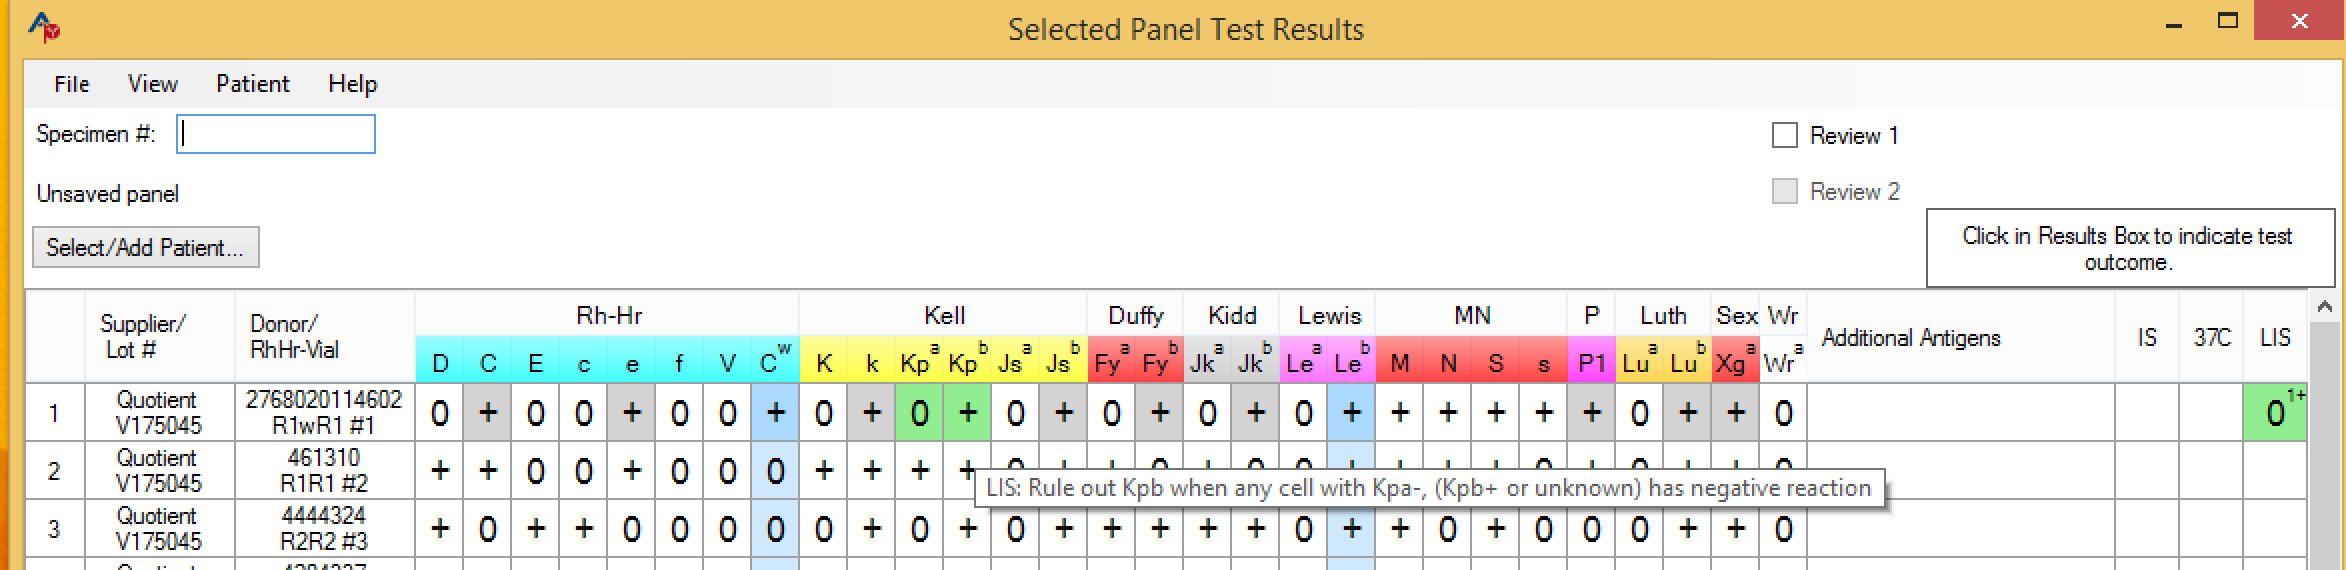

Adsorption Columns
Adsorption columns may be added and set up for consideration of specific antigens. Results in this column will only apply to the designated antigens.
Unevaluated Columns
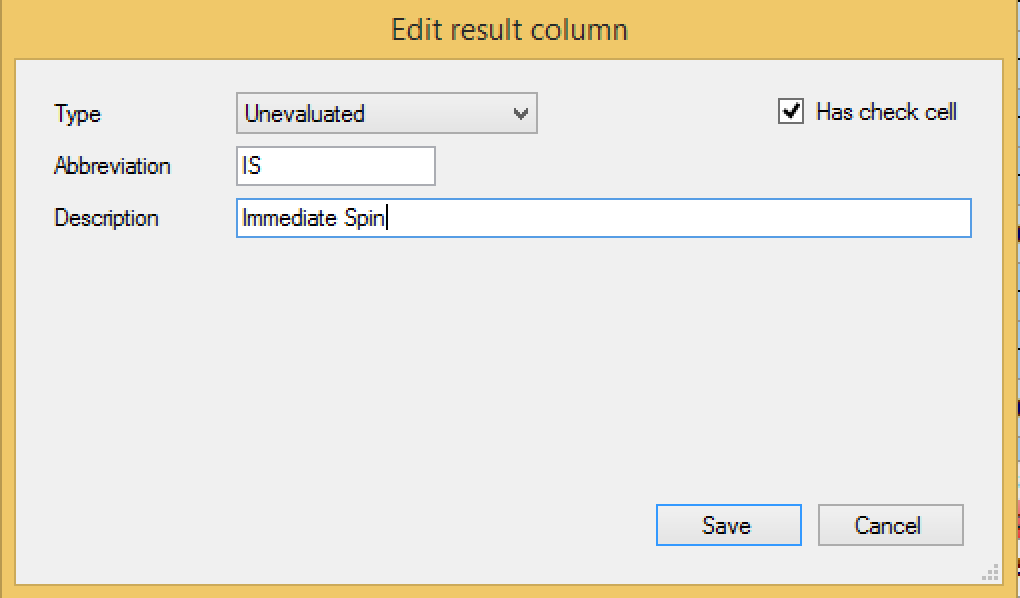
The Unevaluated Column type allows the user to enter results without those results affecting the evaluation text or the color-coding. These results will display in the Unevaluated column in your Results Worksheet and on printed copies, but they will have no effect on your evaluation. The abbreviation may be changed and a description may be added in the Edit Result Column window. The unevaluated columns are shaded in grey.
Auto Control
If there is a patient phenotype entered for your current patient, this will automatically populate the Auto Control row at the bottom of your test cells in any Results Worksheet. A warning will appear in the Evaluation text if a positive reaction is recorded in the Auto Control row, indicating a possible autoantibody.
Conclusions
If, as a result of your workup, you have reached a conclusion about the patient’s antibodies, you may enter that conclusion when you save the worksheet. Two fields are available: Conclusion Antibodies, which allows you to select from any of the 28 evaluated antibodies, and Conclusion Notes, which allows free text about your conclusion, including other antibodies and any comments. Conclusion Antibodies and Conclusion Notes will display at the top of Results Worksheets next to the patient’s name and in the patient details.
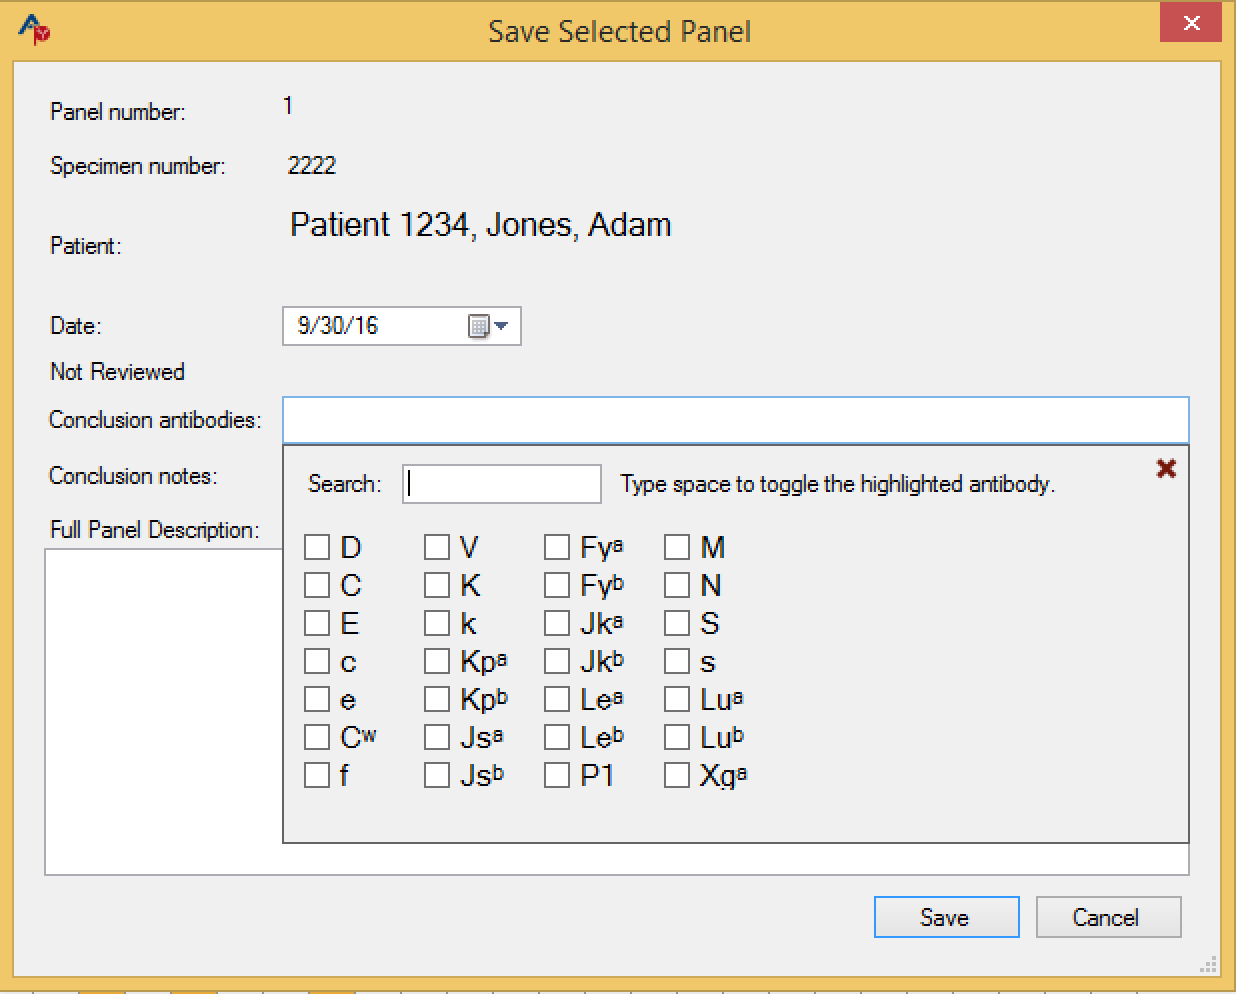
If you like, you may save the Conclusion Notes text for automatic entry in a future case. To do this, enter your text in the lower text box next to the Add button. Clicking Add will place this text in the middle text box, which will collect all saved Conclusion Notes. When adding Conclusion Notes, you may then select a saved note (or multiple notes) from this box.
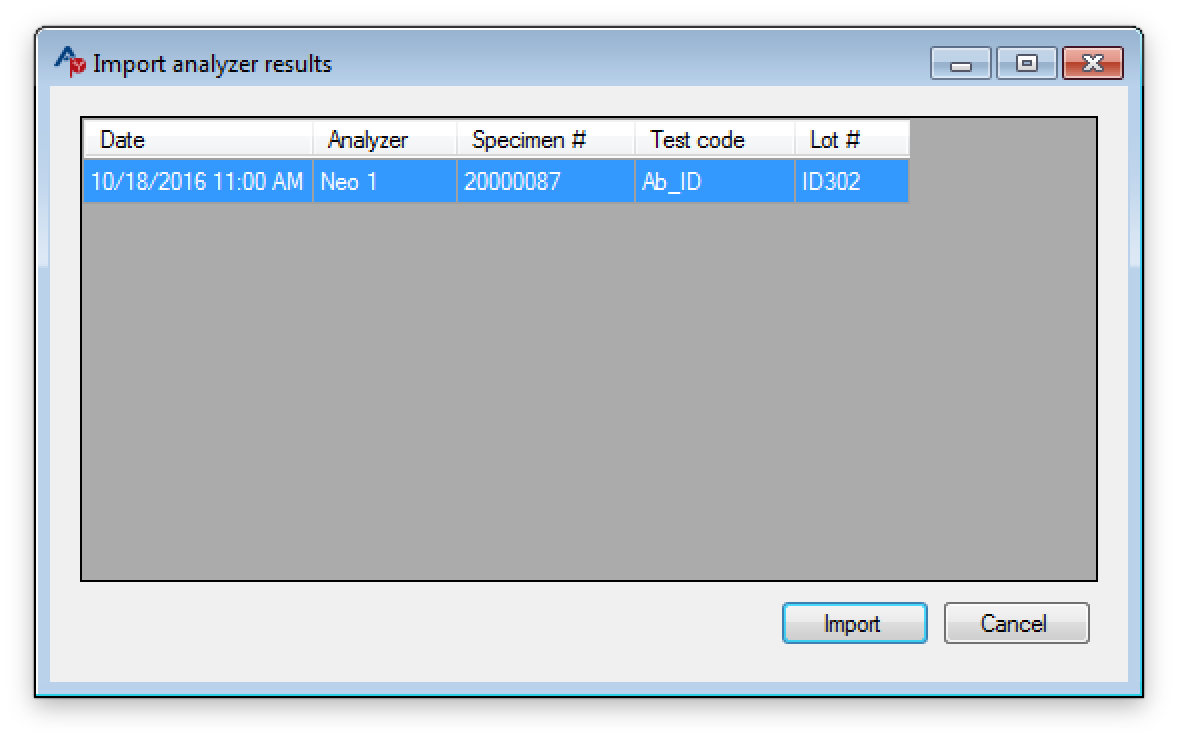
Importing blood analyzer results
When importing results from a blood analyzer machine, a Results Worksheet will be generated that only includes the single blood analyzer results column (the default columns will not appear). The user may then add, edit, and rearrange additional columns.
For instructions on connecting with a blood analyzer, please see the document “Antigen Plus: Description, Requirements, and Specifications—What Your IT Needs to Know” available at www.antigenplus.com .
Import Analyzer Results Screen:
Imported Results on a Worksheet:
Reviewing a Saved Panel
Once aresult or results have been entered in a Results Worksheet and the worksheet has been saved, a user with appropriate privileges may review it. After a panel has been reviewed, no further changes may be made to the worksheet, unless the reviewer unchecks the review box. Only the user who reviewed a panel or an administrator can remove the review from that panel.

A user with “full-user” privileges may only review a panel on which that she/he has not entered any results i.e. only review someone else’s work. An administrator may review her/his own work.
A second review may be entered after a first review following the same rules. If anyone changes reviews on a saved panel, a prior iteration of the panel will be maintained with the original reviews in Panel History.
Printing
Print and Print Preview menus are accessed from the file menus of the Selected Cell or Results Worksheets. Antigen Plus allows you to choose the printer and/or paper size and orientation from either menu. Letter size in landscape mode is necessary to properly format your print out or PDF file.
Data Entry
Antigen Plus allows the entry of unique cells and/or lots from suppliers other than those currently licensed by the FDA to sell red blood cell panels in the United States. Most hospital transfusion services will rely solely on commercial suppliers and entry of red cell data may never be necessary or may be restricted to adding or correcting a typing on an existing cell. Complete red cell phenotype data entry is described at the end of this section. The user may make changes to a supplier’s donor phenotype based on additional typing by calling up the donor on the Add/Edit screen, entering the changes (reactions, special typings etc.), and clicking the Save button. These changes will not be maintained for the donor in any subsequent lot, so it is strongly recommended that you note the change in the Donor Note, which will remain with the donor regardless of lot.
If you edit a cell that is currently selected, those changes will not be reflected on the current worksheet. Either save and re-load the panel to see the changes, or de-select the cell and re-select it.
Donor Note
An optional note may be stored with each Donor ID by selecting Donor Note from the View menu when the donor is displayed in the Donor ID box. Type your note in the Donor Note text box and then select Save and Close.
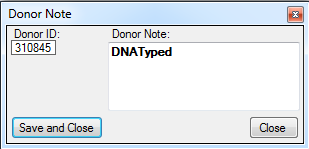
A Donor Note is associated with the Donor ID only, not the Lot, so it will appear with every Lot that a donor ID is in. When a Donor ID has a note on file, that information will be displayed whenever that donor is on the Add/Edit or Search screens.

Data Entry of Individual Cells
Data may be entered or changed in a box whenever the cursor is positioned over that box. The cursor can be moved to another box by pointing to it with the mouse and clicking the left mouse button. The cursor also moves to the next box by pressing the Tab key, or to the previous box by pressing the Shift + Tab keys. Previously saved data can be viewed and selected by clicking the little down-arrow to the right of the box, or by pressing the Ctrl + Down Arrow keys while the cursor is in the box. The box will be “opened”, and the data will be displayed in numerical and alphabetical order. Any item in the list can be selected with a mouse click, or by highlighting it with the Up or Down Arrow keys and pressing Enter. Alternatively, items can be scrolled without opening the box by pressing the Down Arrow key. A list box may be opened at a particular spot in the list by first entering a character or characters in the box and then opening it. A button may be activated or “pushed” by clicking it with the left mouse button, or by moving the cursor to the button and pressing any key. You can tell when the cursor is on a button because its outline becomes darker, and if it has writing on it, the writing is surrounded by a dotted line. As with boxes, the cursor can be moved from button to button by using the Tab or Shift + Tab keys, or by clicking directly with the mouse. In general, the cursor moves from left to right and top to bottom on the screen. A donor cell is identified by its Donor ID and Lot Number. A donor number or lot number may appear any number of times, but the Donor ID - Lot Number combination must be unique. In order to save a cell in the database, it must have a non-blank Donor ID and a non-blank Lot Number. When you are entering several cells from a single antigram or lot panel, the data boxes are blanked after you Save, but remain indexed at the last item entered. Therefore, when you enter one cell and save it, then enter a new Donor ID number, you can Tab to the Lot Number box and press the Down Arrow to recall the previous Lot. Its expiration date and supplier will also appear, saving you from having to re-enter the data.
Donor Number
The Donor No. box will accept up to 16 characters and may be any combination of capital letters and characters except apostrophes. Enter a donor ID and press the Tab key to move on to the Lot Number box. If the donor is already on file, the cell data will be retrieved and displayed.
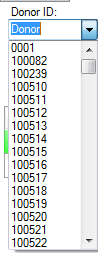
Drop-down (or list) boxes have a scroll bar. One donor may be present on several different panels. If a donor has more than one cell on file, and her previously existing ID is entered, the most recent one found will be displayed. This is to facilitate entering duplicate donors - when you wish to enter a donor who is already on file into a new lot number, the old phenotype will automatically appear, and you then need to enter only the new lot number, check the expiration date, and click the Save button. It is assumed that the phenotype will not have changed from a previous panel.
Lot Number
The Lot Number is used to show the supplier’s unique lot number for this cell’s panel. All cells with a given Lot Number will have the same supplier and expiration date.
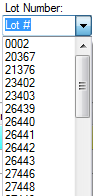
The Lot Number box will accept up to 16 characters and may be any combination of numbers and capital letters. Enter a lot number and press the Tab key to move on to the Vial box. If the lot number was already on file, the expiration date and supplier will be retrieved and displayed.
Vial
The Vial box will accept any number from 0 through 99. It will also accept a TC (tech cell) vial.
Enter a vial number or TC and press the Tab key to move on to the Expires box. Pressing the Up and Down Arrow keys or clicking the little up and down arrows to the right of the box will automatically raise or lower the displayed vial number. TC is located below the 0.
Expiration Date
The Expires box is for the expiration date of all cells in the lot number displayed. You may enter a date in any format that is comfortable for you, such as “20 Dec 10” or “12-20-11”, then press the Tab key to move on to the Supplier box. The date will be re-displayed in the format set in the
Windows Control Panel/Regional Settings/Date function. If the date is before the present system date, a bright red Out of Date! will appear under the Expires box. The expiration date is stored with the lot number, so if you change the expiration date of a lot number, then ALL cells with that lot number will have the new expiration date.
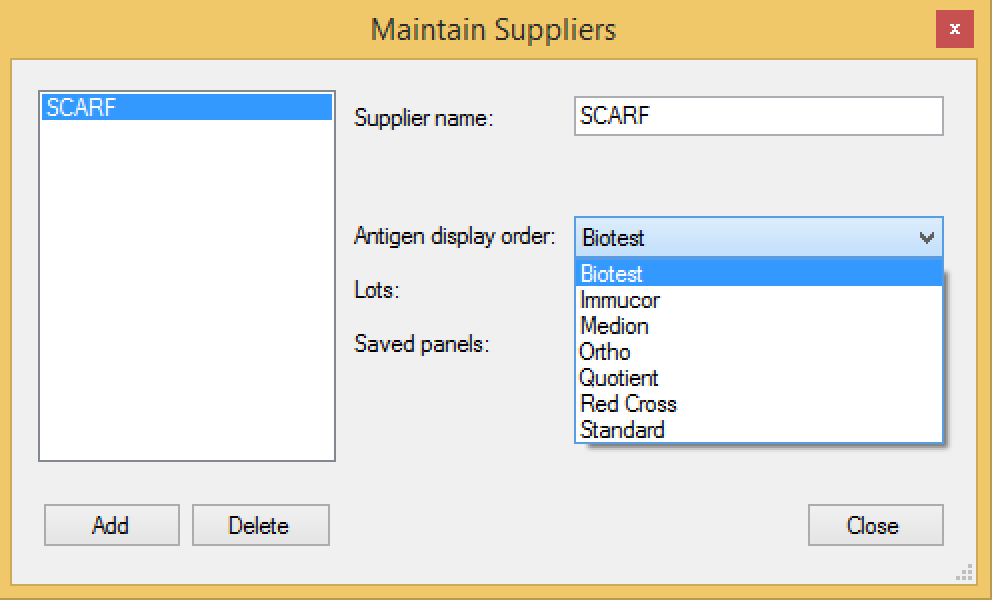
Supplier
The Supplier box is populated with default commercial suppliers and any that you have added in the Suppliers table found in the View menu. When a supplier is changed in the Supplier box, the antigen array below will change to match that Supplier’s array.

The supplier is stored with the lot number, so if you change the supplier of a lot number, then ALL cells with that lot number will have the new supplier.
Location
Enter a storage drawer location for a frozen cell. The location is stored independently and will not affect other cells with the same lot number–should there be any. The Location box will accept up to 64 characters in any combination of letters and numbers.
Rh-Hr
Antigen Plus comes with the standard Rh-Hr phenotype designations loaded in the drop down box that is activated by clicking on the down arrow adjacent to the Rh-Hr entry box. Choosing one of these designations by clicking on it will place it in the entry box and will mark the appropriate pluses and negatives in the Rh-Hr antigen group. If changes are made to that antigen group, the Rh-Hr phenotype will be cleared when the cell is saved. A user may save the cell again with the proper phenotype or leave it blank.
Note: Antigen Plus no longer specifies the Cw antigen in Rh-Hr designations since we cannot predict 100% when C will be on the same gene complex as Cw.
Automated Antigen Order on the Add/Edit Screen
On the Add/Edit screen, the array will match the supplier currently selected and appearing in the Supplier Box and will change automatically as the supplier is changed.
You may add a supplier with any one of these arrays from
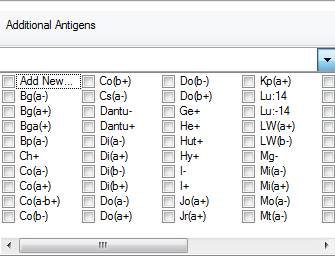
Additional Antigens
The Additional Antigens box consists of an entry box, checkboxes, and a display box directly above them containing this cell’s additional antigen phenotype. You may enter an additional antigen in the Add New entry box, or select one from the list by clicking the box. To add what is in the entry box to this cell, check thebox. To remove an antigen from a cell uncheck the appropriate box.
There is no limit on how many additional antigens you may enter. However, once the screen space is used up, further antigens will be stored but not displayed. When there are more additional antigens than can be displayed on a Lot Panel print out, an ellipsis (“…”) at the end of the additional antigen list (displayed alphabetically) will indicate the presence of the additional typings. Mousing over the display all of the antigens present along with their associated ISBT designations.
A table of ISBT designations used in Antigen Plus can be found in the Appendix.
The reason for the entry-box method of adding additional antigens is to ensure consistency: you must be consistent in your notation in order for a search to work properly. For example, to indicate a Colton b antigen (Cob) as positive, you may enter Co(b+), CoBPos, or any other notation that is 8 characters or fewer, but you should use the exact same notation for all cells with this antigen. The entry box will contain a list of all the additional antigens previously saved in your inventory, and you should check for an antigen’s presence before entering a new one. The ISBT designations can be consulted for more precision in nomenclature. A table of ISBT designations used in Antigen Plus can be found in the Appendix.
Out Of Stock
To mark a cell as exhausted, click the Out Of Stock button, click OK in response to the pop-up query, and then click the Save button. The following warning will appear:
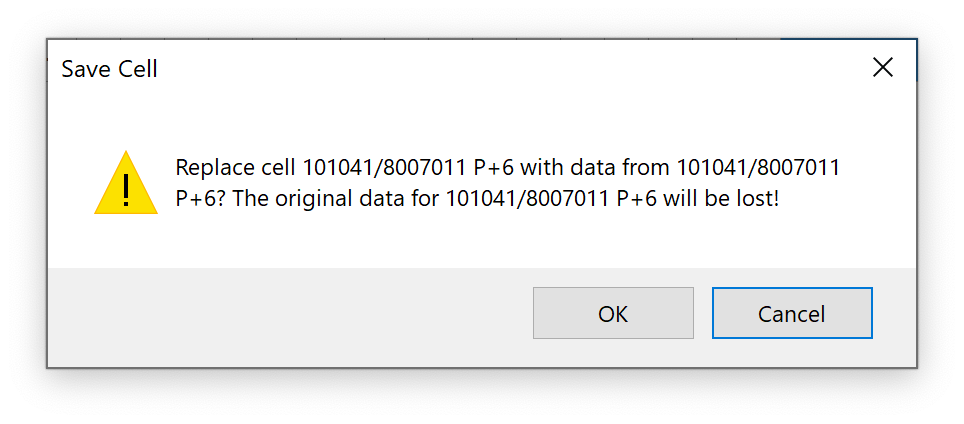
In this case the only change in the cell data will be the out of stock designation.
The data will remain on file so that you can recall the phenotype in case the cell shows up in a new lot, and will remain in any saved panels. The cell will not be available in the search process unless you mark the Include in Searches feature in the Out of Stock Inventory box in the System Options menu. When you click the Save button, you will be given the option of marking the entire lot as out of stock. Click Yes or No in the popup window, or type y or n, to indicate your choice. Please note: If you do not click the Save button after marking the cell as out of stock, the cell will remain in stock and the out of stock flag will not reappear on the screen when that cell is recalled.
Sex
Clicking the Sex button will change the button from blank to M to F. This is optional information, and not normally of significance in the selection of panel cells.
Group
The Group button allows you to enter the blood group of the donor cell. Since most commercial panel cells are group O, that is the default setting. To change the blood group to A, B, or AB, click the Group button until one of those characters appears. To leave the blood group unspecified, click the Group button until a blank appears.
Frozen
Click the Frozen box to mark a cell as frozen. The expiration date will be blanked. Frozen cells will be found last in the search process, since searching is done starting with newest cells first.
Antigens
The 28 principal antigens are displayed with colored labels for easy identification. When you are entering a new cell, all the antigens will have a blank setting. You may change a setting to a +, s, w, or blank by clicking the button with the mouse pointer (right and left mouse clicks scroll through the choices in opposite orders), or by moving to a button with the Tab key and pressing any other key. A blank setting indicates that no information is available. For example, some suppliers may not include the Kell system Kpb and Jsb, so you may blank these antigens’ buttons.
Save
Clicking the Save button will save all the cell data displayed for the unique Donor No. - Lot Number combination. Any items not previously present in the data boxes (Donor, Lot, Expiration Date, Supplier, Additional Antigens, and RhHr) will be added to the lists in those boxes. The cell display is cleared and the cursor returns to the Donor No. box. The Lot Number, Expiration Date, and Supplier are saved as a group with the Lot Number. If you have changed the date or supplier of a lot, then ALL cells with that lot number will have the new date and supplier. A Donor Note is saved only with the Donor ID, and stays with the Donor ID regardless of which Lot it is in.
Delete
Clicking the Delete button will prompt you to make sure, then remove the displayed Donor No. – Lot Number combination from your inventory as long as it has not been used in the last ten years in any saved work. When a cell is deleted, any unique lot, additional antigen, or RhHr information it may have had will also be deleted from the lists in those boxes.
Delete Lot
Clicking the Delete Lot button will prompt you to make sure, then remove ALL cells with the displayed lot number (the ten year rule applies).
Multiple User Procedures
There is no restriction on the number of users who can use Antigen Plus and share its data at the same time. There are, however, some default rules of precedence in cases when new data are added to the system by one of the users and where the same data are altered and saved by more than one user in a session. Your SOP should make note of the following rules:
When a user downloads a new lot into the system, the cells within the lot that lot will be available for searches by other users and will appear in the Maintain Lots screen, but will not be available in the Lot drop down list on the Search or Add/Edit screens until the other user clicks the Refresh Data option in the File Menu (or simply presses the F5 key).
If two users have the same saved panel open, the second one to save will be the current panel iteration even if the first user has changed and/or reviewed the panel. The first user’s panel will be available as a prior iteration, but will have to be recreated to be a current one (this can be done by opening the current iteration and making the necessary changes using the prior iteration as a guide). However, the first user’s saved panel will appear immediately on the Panel History screen, so to ensure that there are no conflicts, a user who suspects that there may be someone else working on the same panel can check the panel history before saving his/her work.